beginner
Changelly’s mobile app lets users exchange crypto and take advantage of the same fair rates and low fees as our web version — but it comes with the bonus of being available on the go. Let’s take a look at what it has to offer and how you can use it to exchange your favorite crypto pairs.
Please note that due to regular updates and bug fixes, there might be some minor differences between the screenshots in this guide and the live version of the Changelly app. If you have any questions or issues when using our app, please don’t hesitate to contact our support team via the live chat on our website or the Support tab in our app.
The Main Features of the Changelly App
When you first open the Changelly app, you will be prompted to create an account. You can skip this step and still get full access to all features; however, we would recommend registering for the best experience.
The main screen of our app features an exchange widget. Besides, there are the following five tabs at the bottom of your screen:
ExploreHistoryConvert (the exchange symbol)SupportSettings
Explore
This is the first screen you see when you open the Changelly app. Here, you can access your Watchlist, see a brief overview of the price history of some cryptocurrencies you have saved, quickly look for the biggest losers and gainers, check the latest crypto news, and more. This is your hub for all things crypto!

You can add cryptocurrencies to your Watchlist by tapping on the little star icon in the top right corner of your screen on that coin or token’s individual page. Please note that this feature is only available for registered users.
History
Here, you can see the history of all transactions you have carried out via the Changelly app and their current status. You can tap each individual transaction to view its rate, fees, and other details.

Convert
Here, you can either buy or exchange any of the 500+ cryptocurrencies listed on our platform.
Exchange

Tap the coin/token ticker to see which crypto assets are available for exchange.
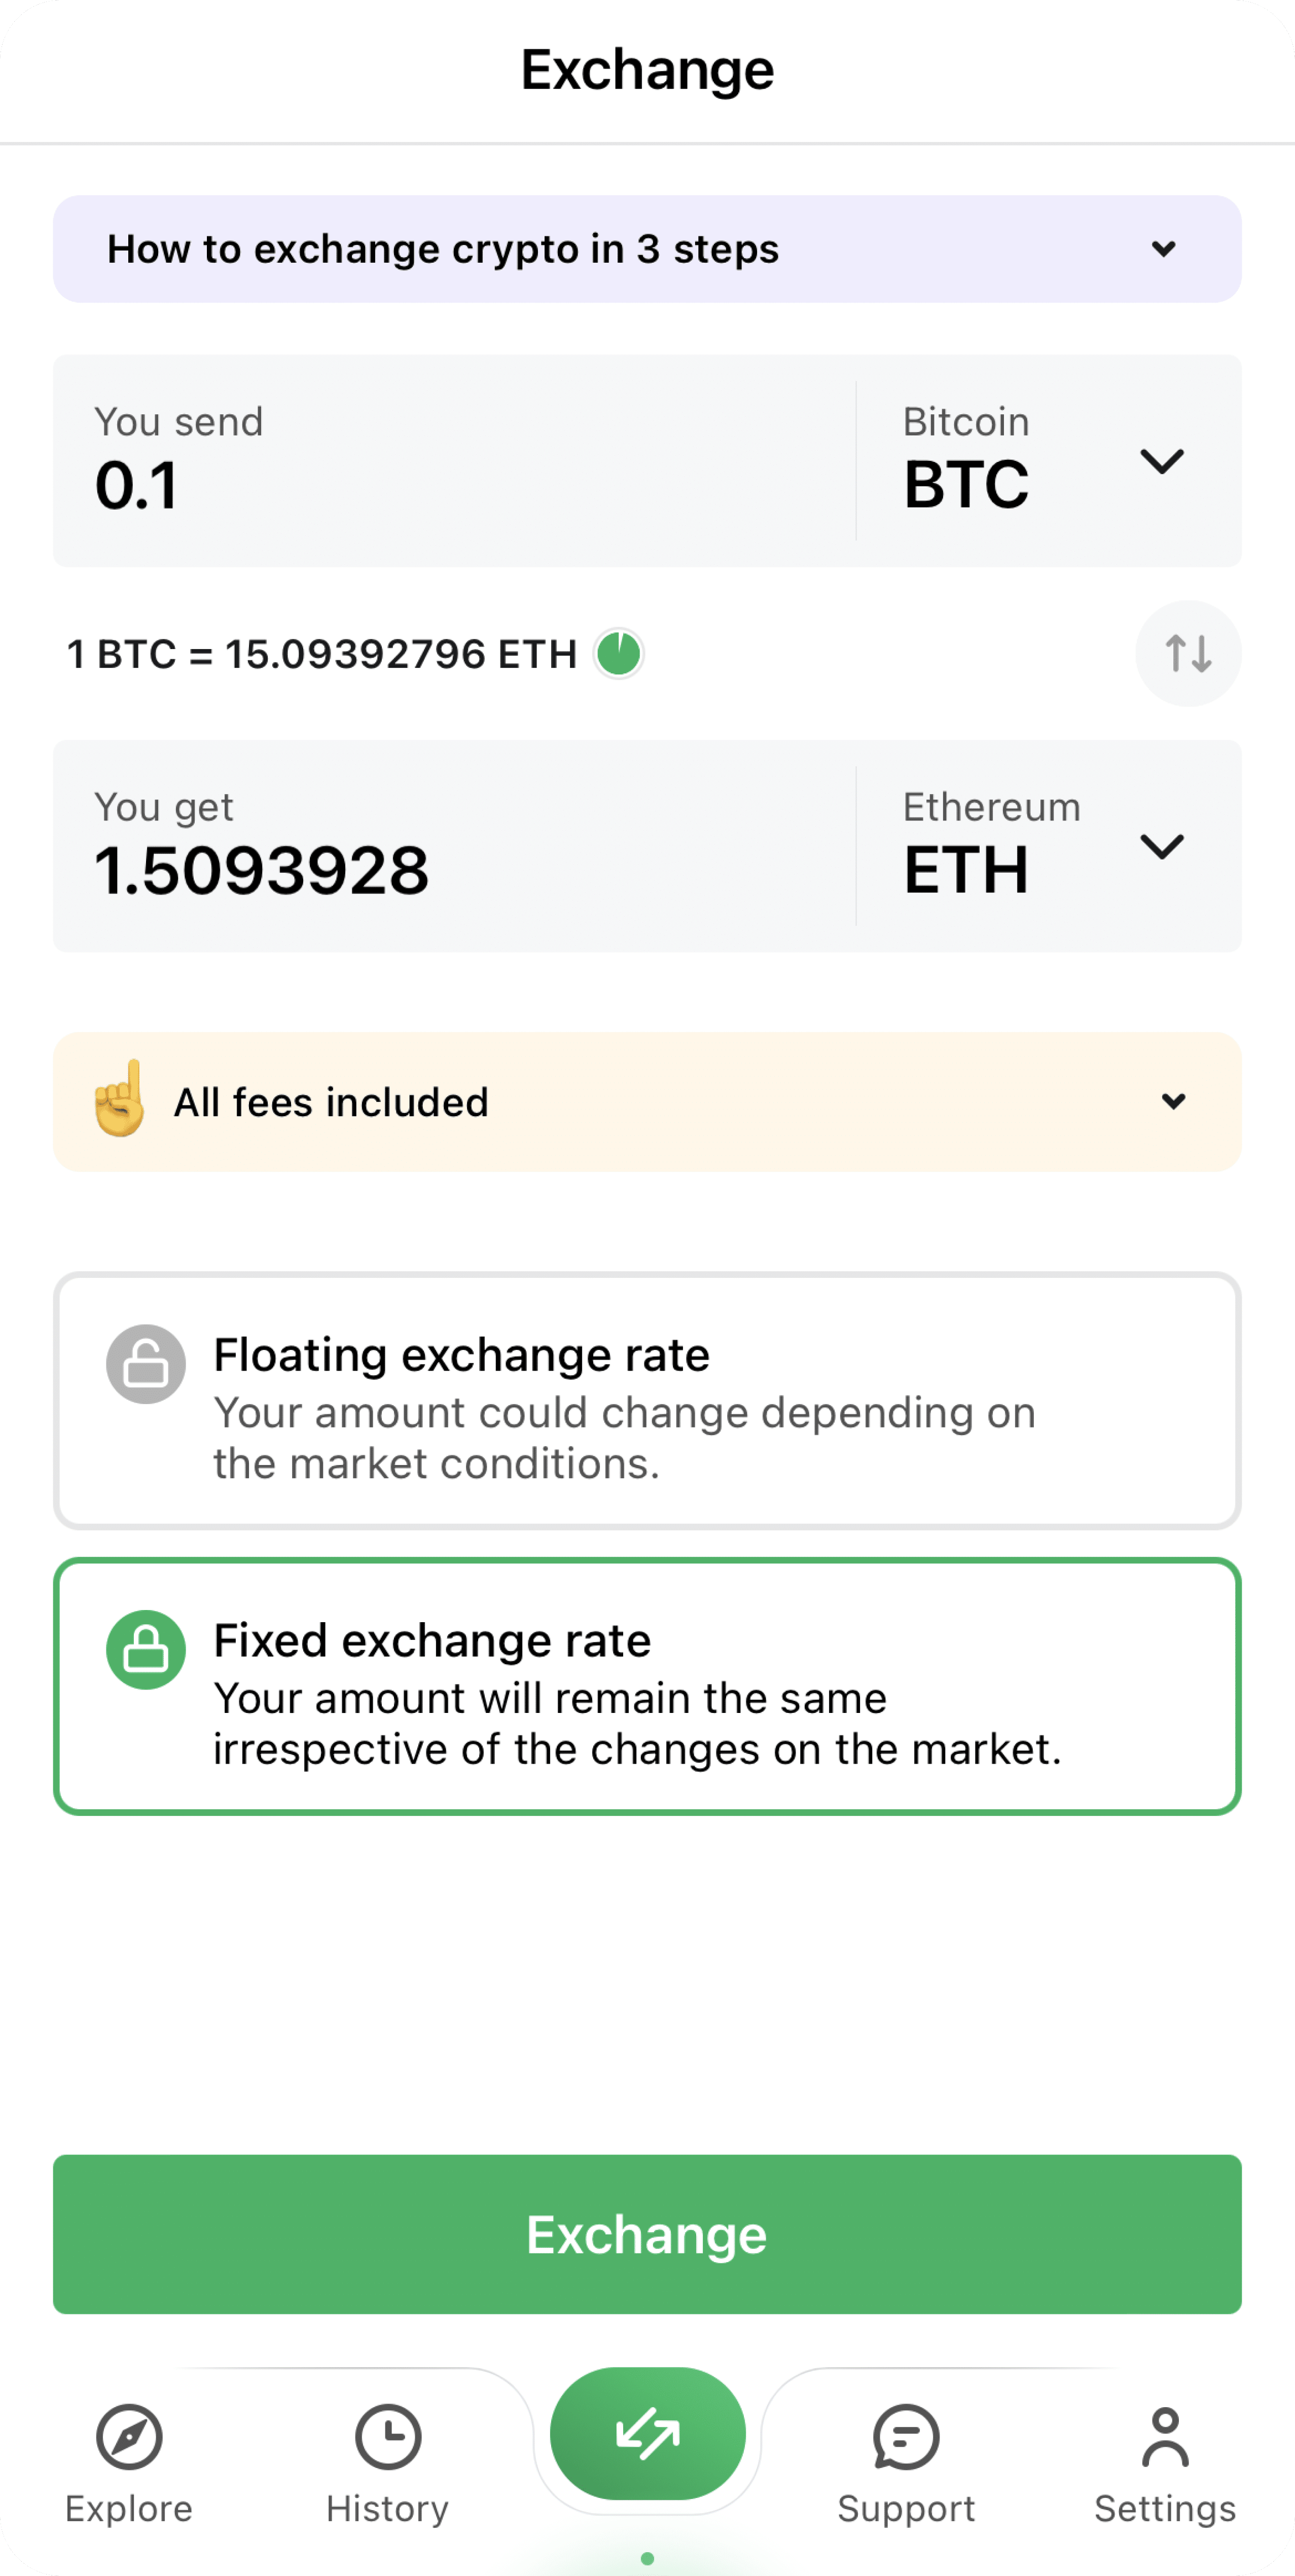
To see what fees you’ll have to pay, tap the “All fees included” info tooltip right beneath the exchange widget. Underneath this tooltip, you will see the option to pick either a floating exchange rate or a fixed one.
Network Types
Please note that some coins and tokens may operate on several different networks at once or can only be transferred on a specific network. On our platform, network type is indicated via the token’s ticker. Besides, there is a small label next to it. For example, USDT on the Ethereum network is called USDT20, while the same token on the Tron network is USDTRX.

The different variations of USDT available on Changelly.
Network types are really important. For example, if your wallet only supports USDC on the Ethereum network, you might lose your funds if you try to send USDCBSC instead. Please make sure to always double-check what token you’re sending.
What is a floating exchange rate?
The crypto market is incredibly volatile, and rates — and fees — can change in a matter of seconds. Considering many crypto transactions can take minutes and even hours to be completed, sometimes the rate you get is not the one you agreed to.
When using floating exchange rates, you basically confirm that you’ll be OK if the rate your transaction actually gets carried out at might be different from the rate you saw when initiating the exchange. Your funds will be exchanged at the best rate available on the market at the moment when your payment to our wallet receives the required number of blockchain confirmations.
If you’re using the floating exchange rate, you will have 3 hours to send your funds to us. Please note that if you don’t send your crypto to us within this timeframe, you should set up a new transaction. The wallet addresses we give you can expire, so if you send any money to them past the 3-hour mark, your funds will be locked up in the system for an unspecified amount of time, and a part of them might even be lost.
What is a fixed exchange rate?
When you choose the fixed exchange rate, you “lock” the rate you currently see on the screen, meaning your exchange will be carried out at that exact price. If you’re using fixed rates, you will have to send your funds to us within 15 minutes. If you don’t send them to us within this timeframe, or if you send less than the required amount, we will have to either
push your order through at a later time if the rate does not deviate from the one you “locked” too much (decided on a case-by-case basis) orissue a refund to the address you entered when creating the transaction.
You can learn more about fixed and floating exchange rates in this article.
Buy
If you would like to purchase crypto instead, go to the Buy tab. We support over 200 fiat currencies and accept Apple Pay, bank transfer, and Visa and Mastercard bank cards as payment methods.

Support
In this tab, you can access our 24/7 Support live chat. Please note that you will need to enter your email address before accessing it.


Settings
In the Settings tab, you can:
Check the app versionAdd your wallet addresses to save them for easier accessChange the app languageChange your passwordTurn on dark modeRate usView our FAQ, Terms of Use, and Privacy PolicyTurn on/off push notifications
How to Exchange Crypto in Changelly App on iOS
Now, let us show you in detail how you can exchange coins and tokens on your iPhone with the Changelly app.
Part 1. Exchange at floating rates
Step 1. The floating exchange rate is chosen by default.

Step 2. Choose the cryptocurrencies you want to exchange by tapping the tickers. Then, enter the amount.
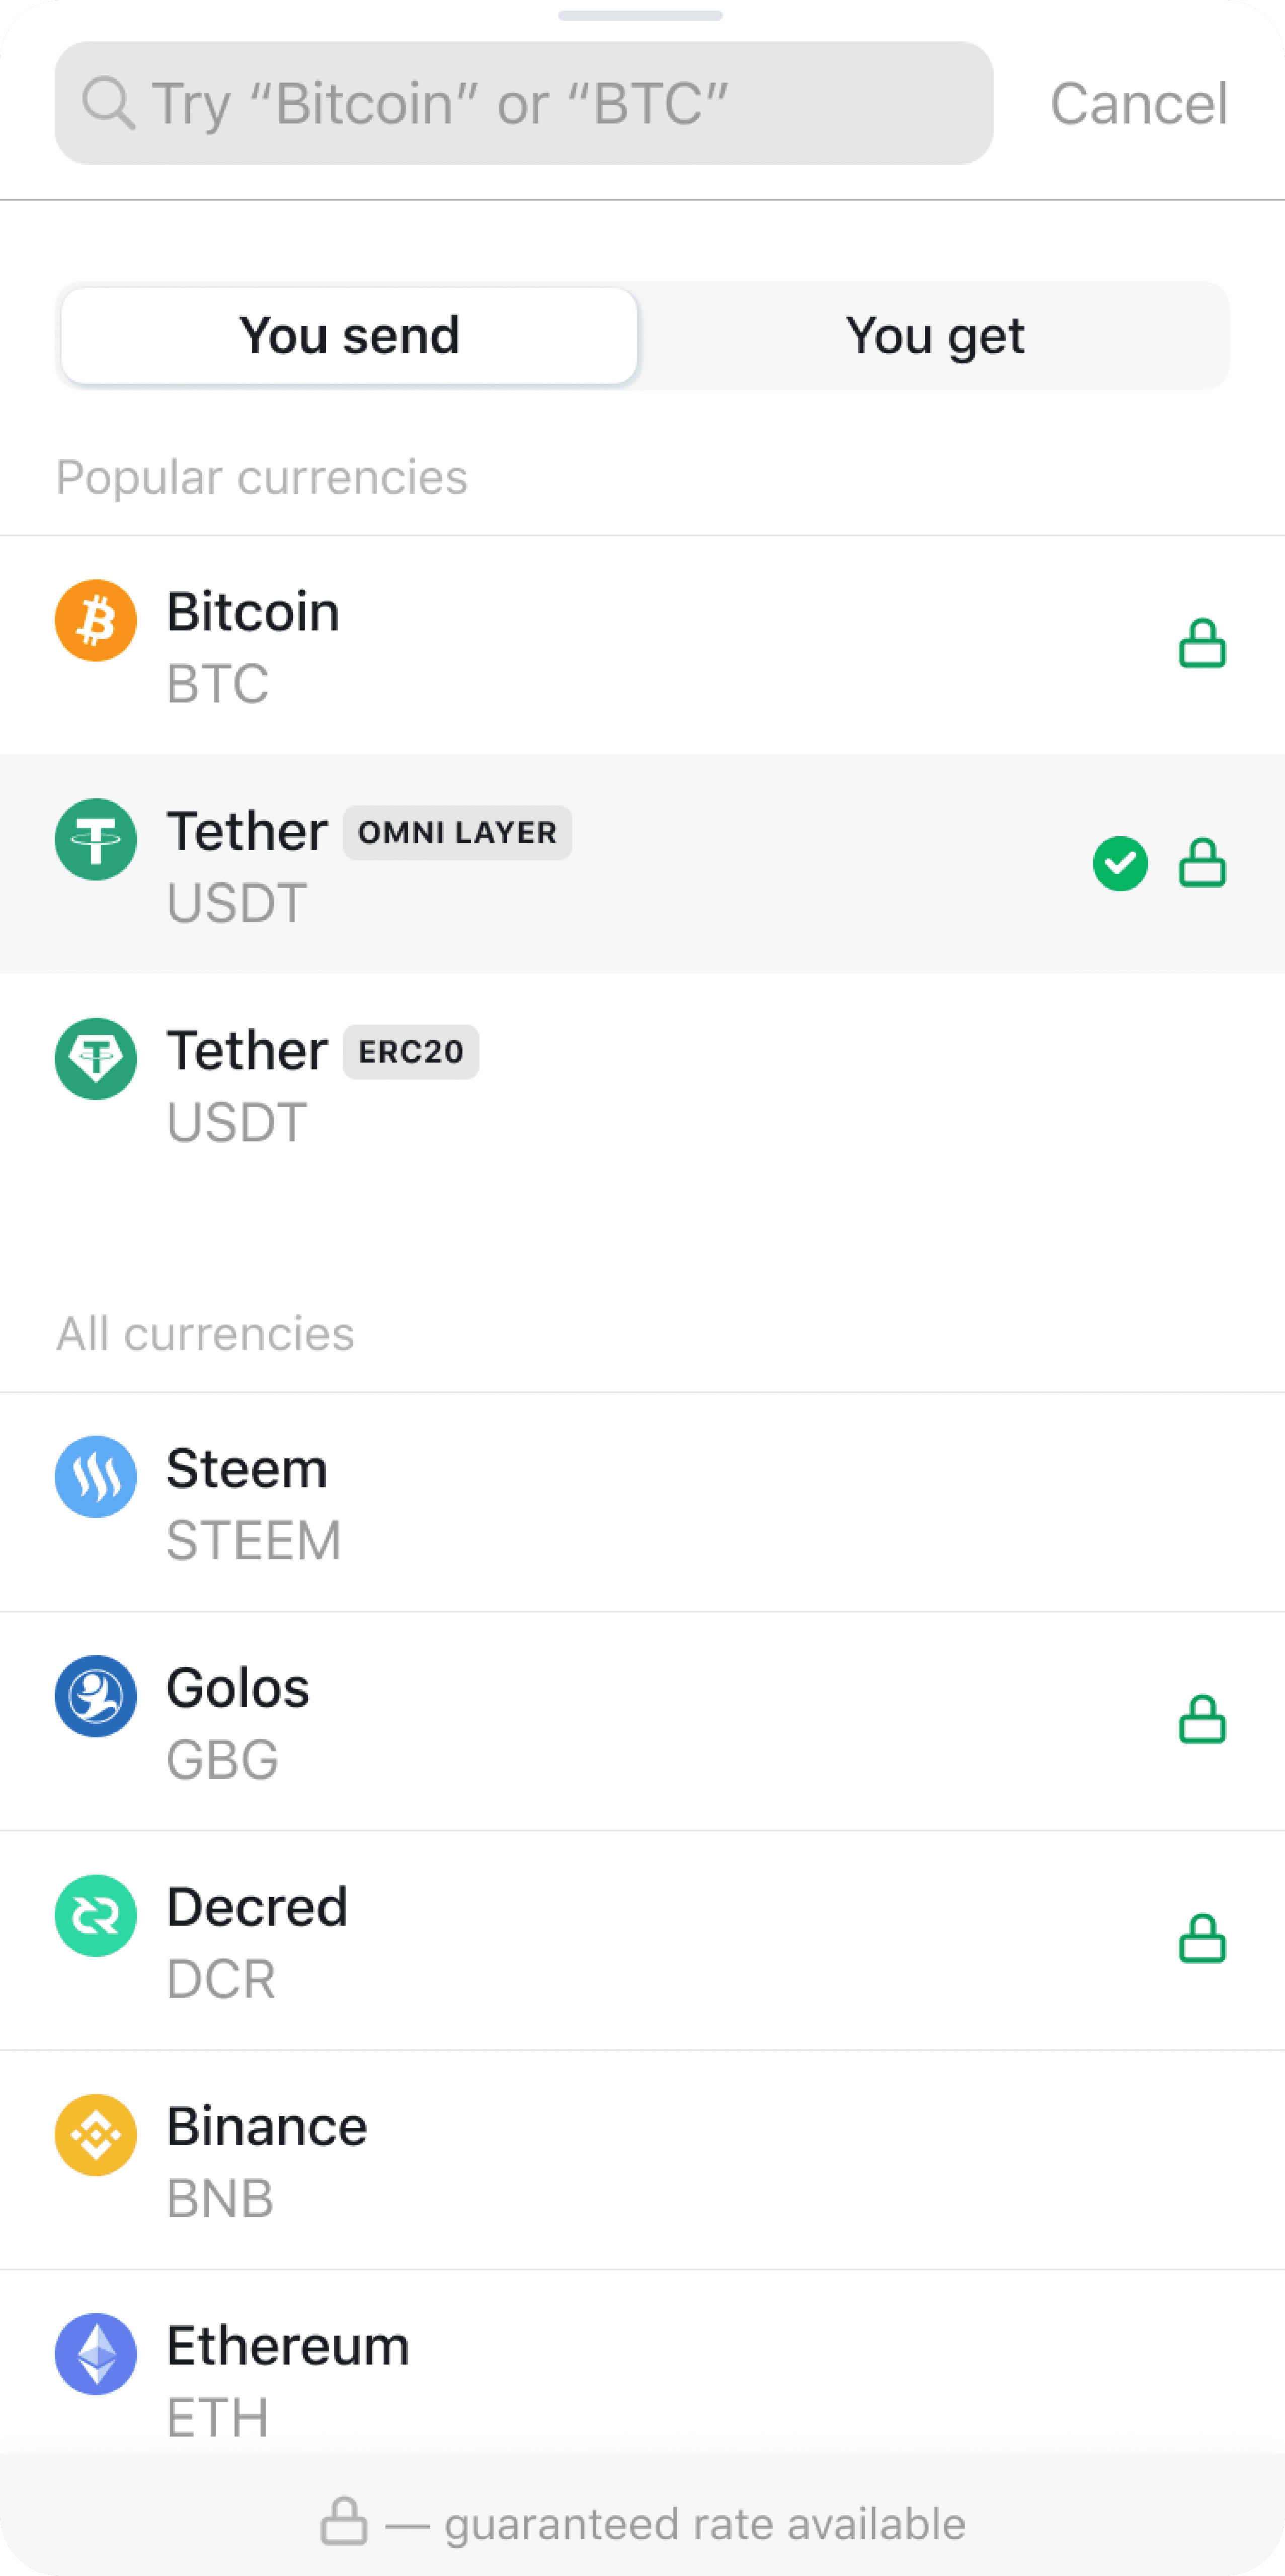
We offer over 500+ cryptocurrencies; you can use the search bar in the upper part of the screen to quickly find the ones you want to exchange.
Step 3. Fill in the destination address of the crypto you want to get.
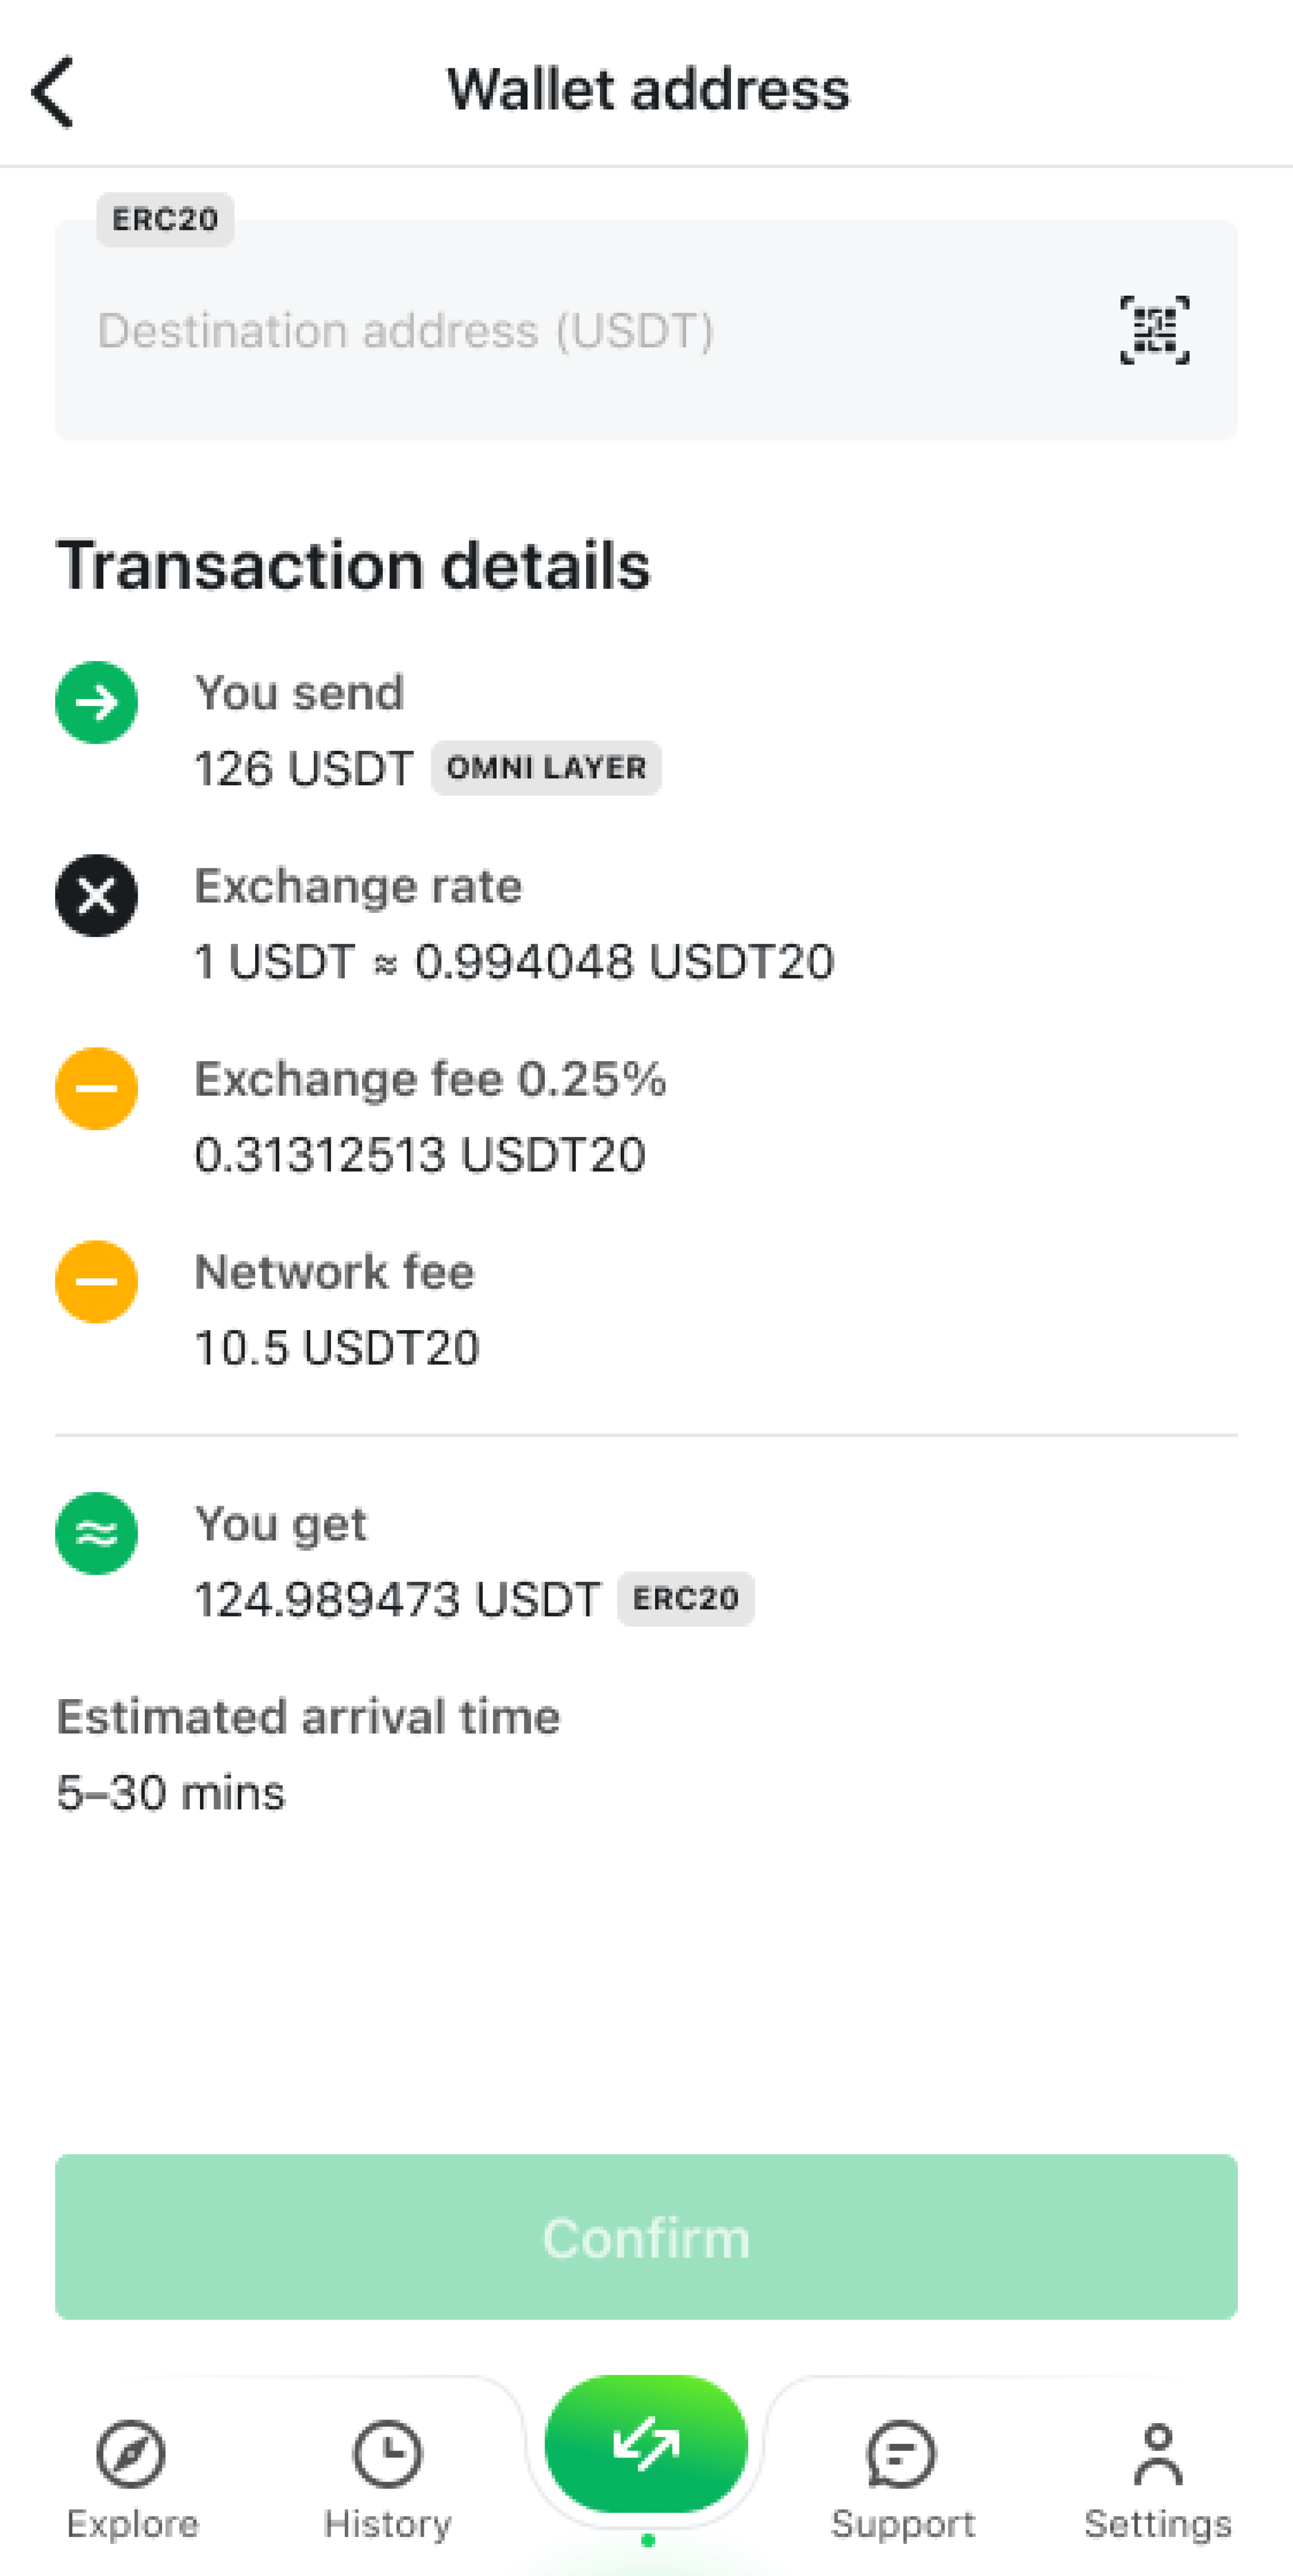
If you’re making an exchange in the Changelly app for the first time, we recommend using a QR code. To do that, tap the small square icon on the right side of the “Destination address (Ticker)” bar.
If it’s not your first time using our app, your address is most likely saved in our system. You will be able to choose it from the list.
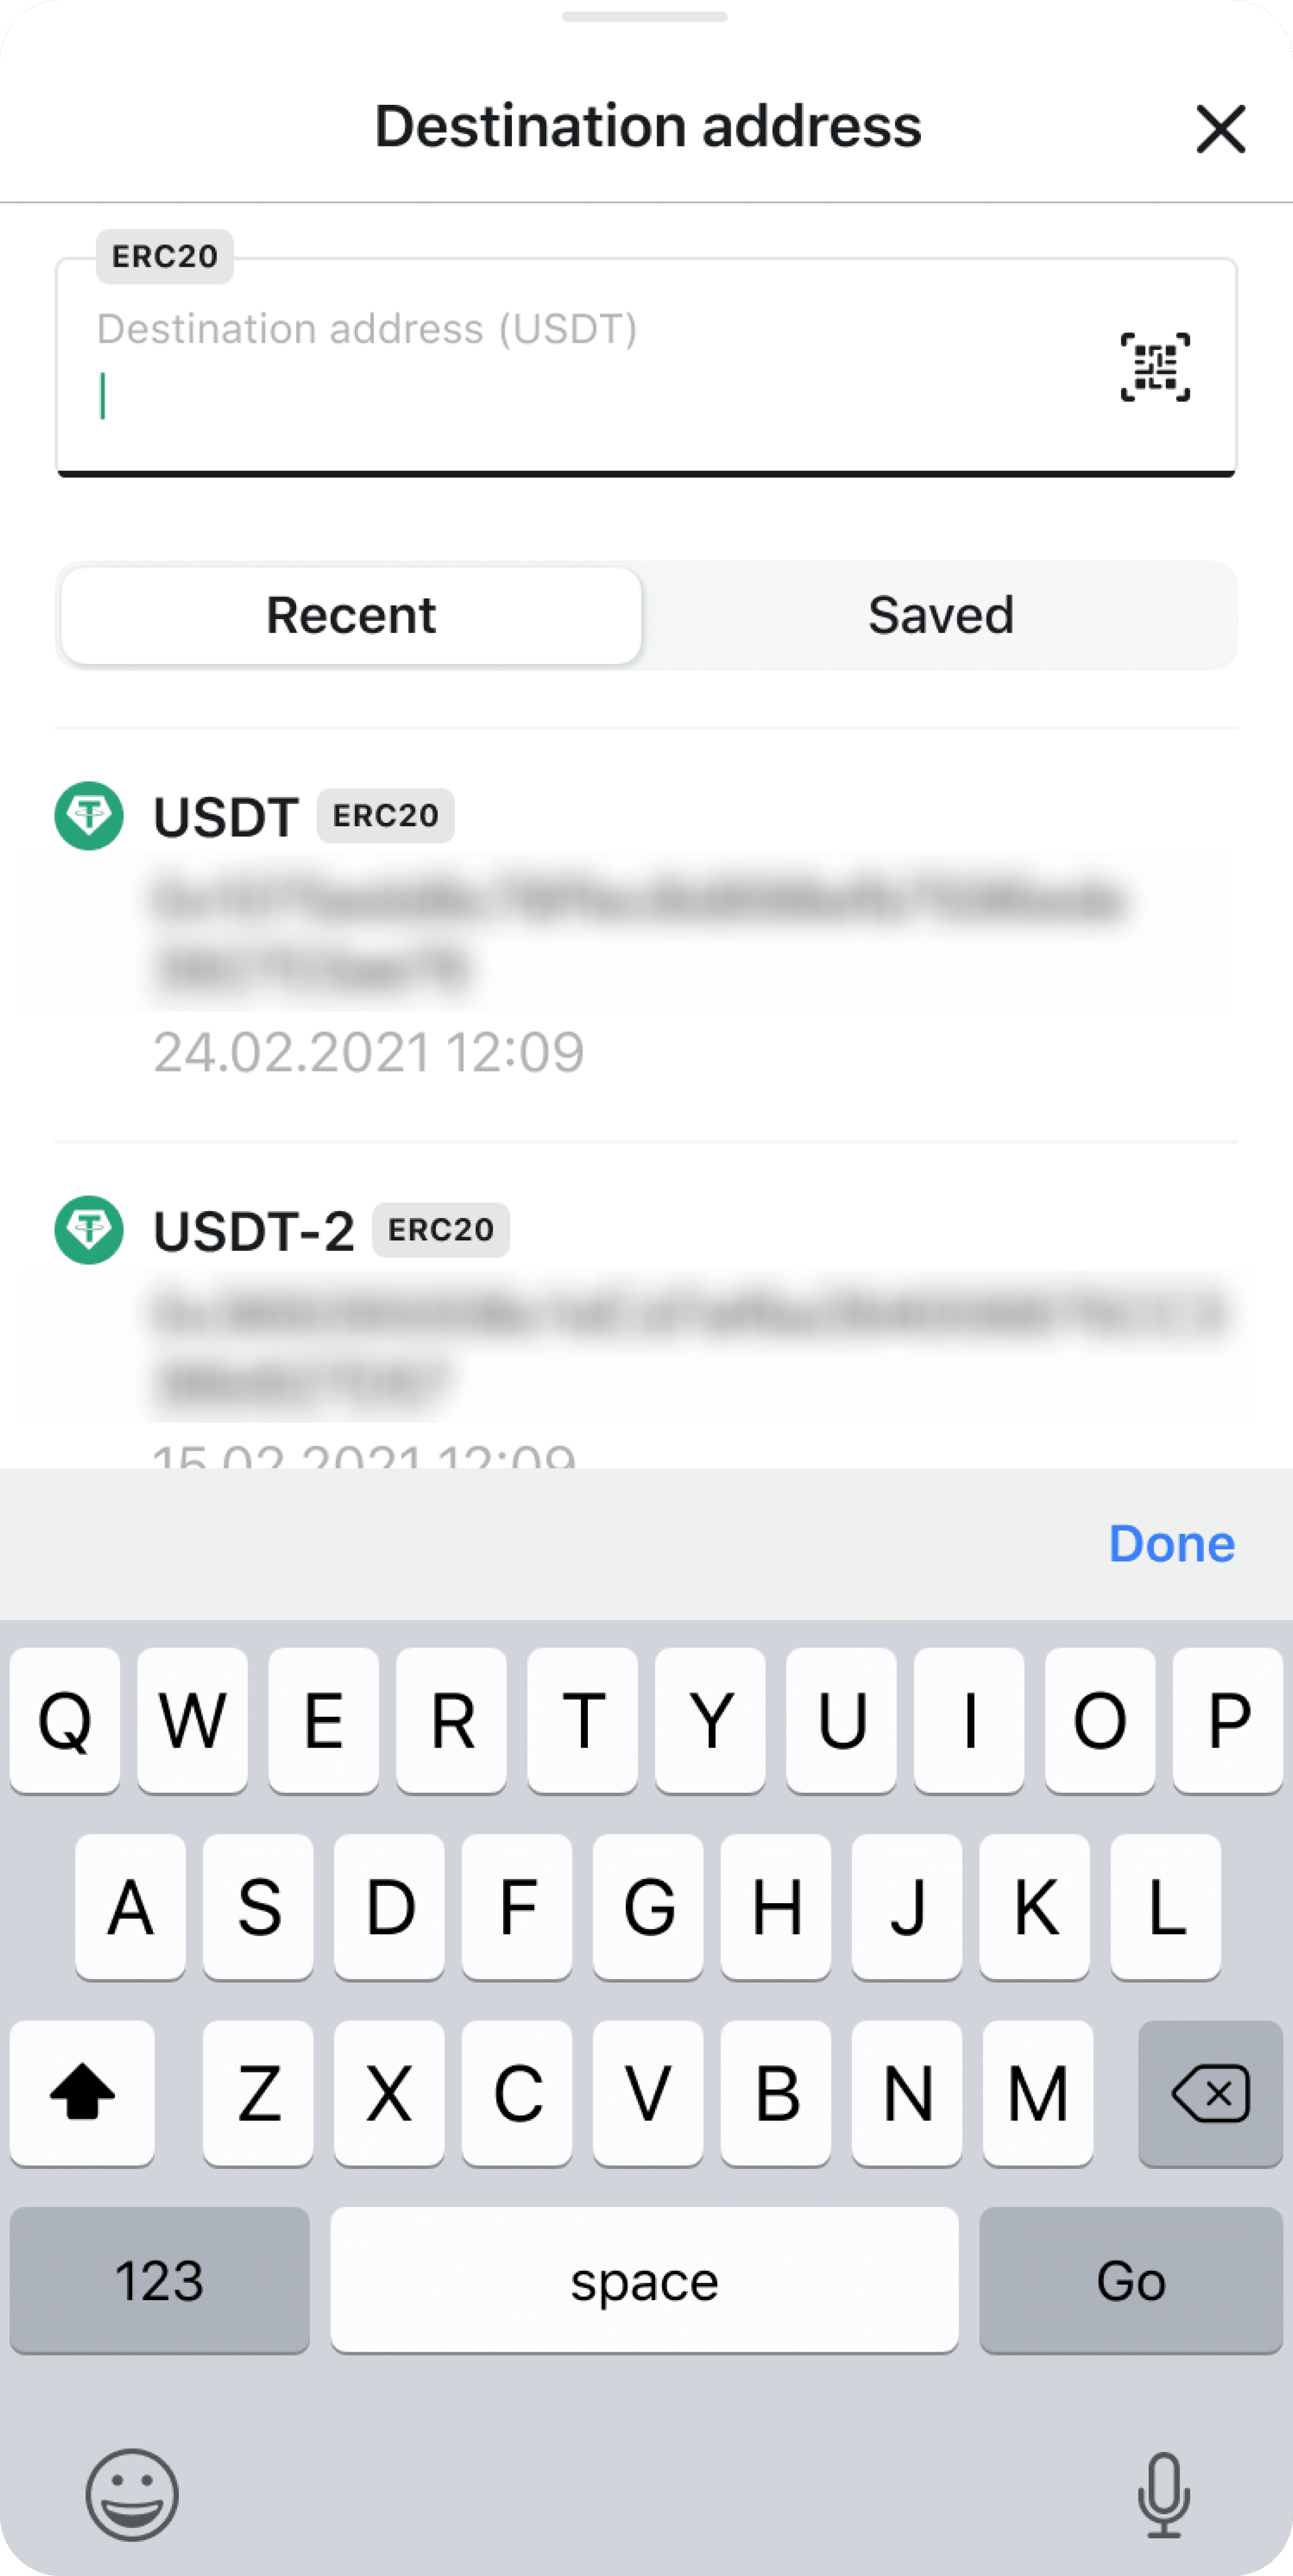
To access saved and recent addresses, tap the “Destination address” bar.
Step 4. Double-check the destination address — don’t forget to make sure that it supports not only the coin/token you’re buying but also its specific network type.
In some cases, you might also have to enter a Memo ID. It is an extra identifier for making transactions on certain chains — you can see the full list of the networks that require it below, in the “What is Memo.ID?” section.
Pay attention to the network fee and arrival time. If everything is to your satisfaction, press Confirm.
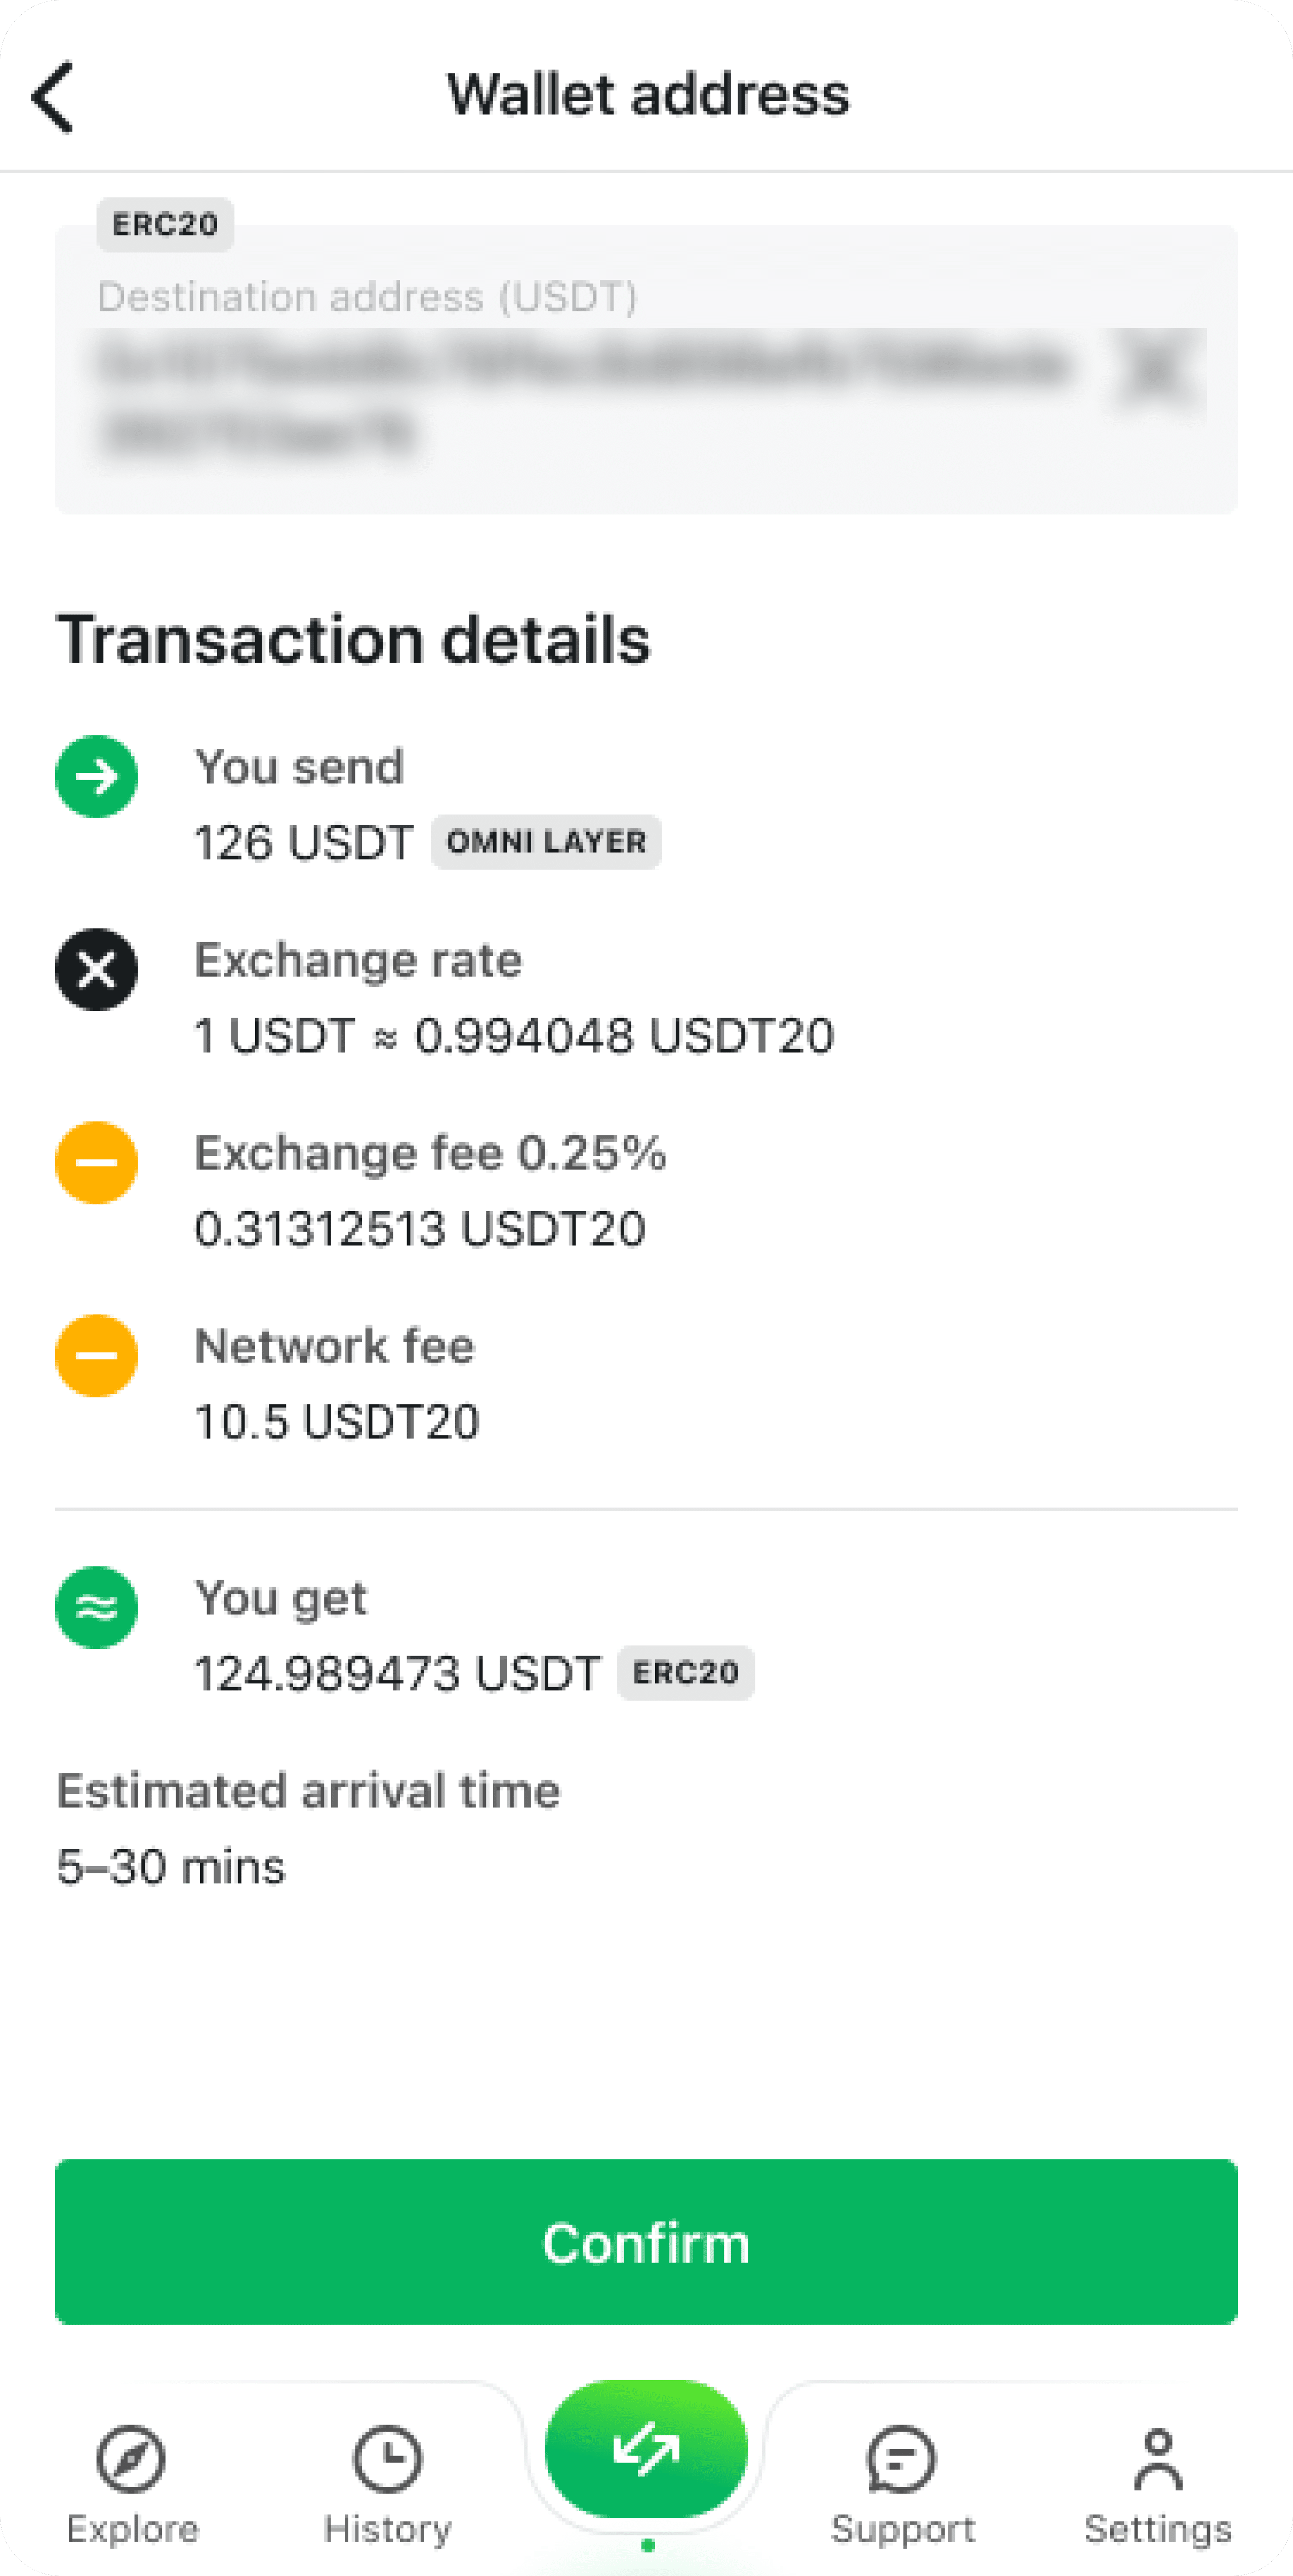
Step 5. We will provide you with a crypto wallet address to which you should send your funds. Once you get it, you will only have 3 hours to proceed with the transfer. There will be a countdown to help you track the time.
Don’t send funds to expired addresses. If you’re not careful, the address can expire. Do not send funds if the transaction has expired; create a new one instead.
Send all your funds in a single transaction. Please note that the funds must be sent in one single transaction — if you know you haven’t sent enough or aren’t sure if the funds have been transferred to our wallet, don’t immediately send them again! Please wait for your transaction status to be updated or create a new transaction instead.
Account for fees when sending us funds. Make sure we receive the exact amount of crypto we have requested from you.
Pay attention to Memo.ID and network type requirements. In some cases, we might ask you to use a specific Memo.ID/destination tag/etc. — please make sure to include it when sending your funds. Additionally, don’t forget that the crypto you send us has to be on the same network you indicated when initiating the transaction.
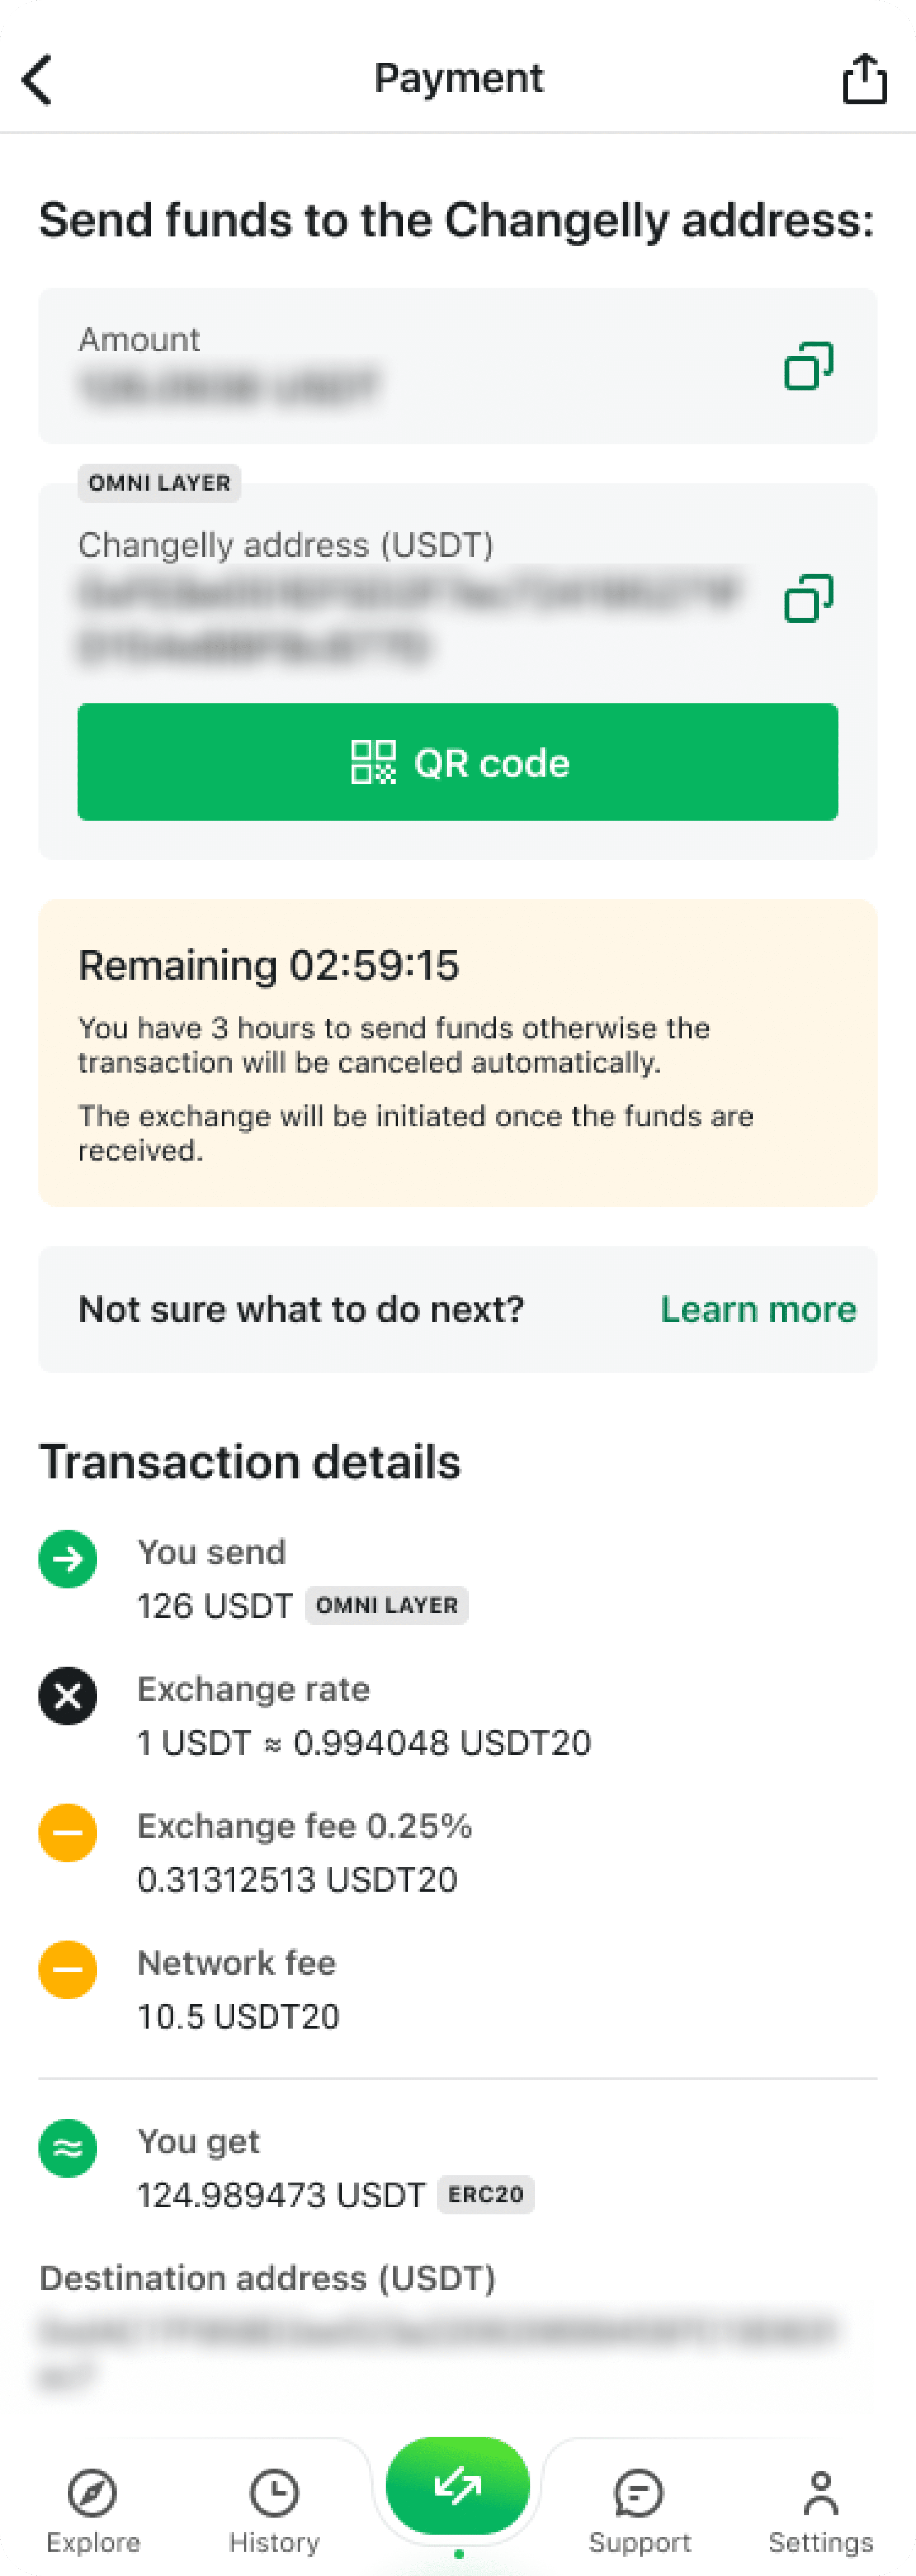
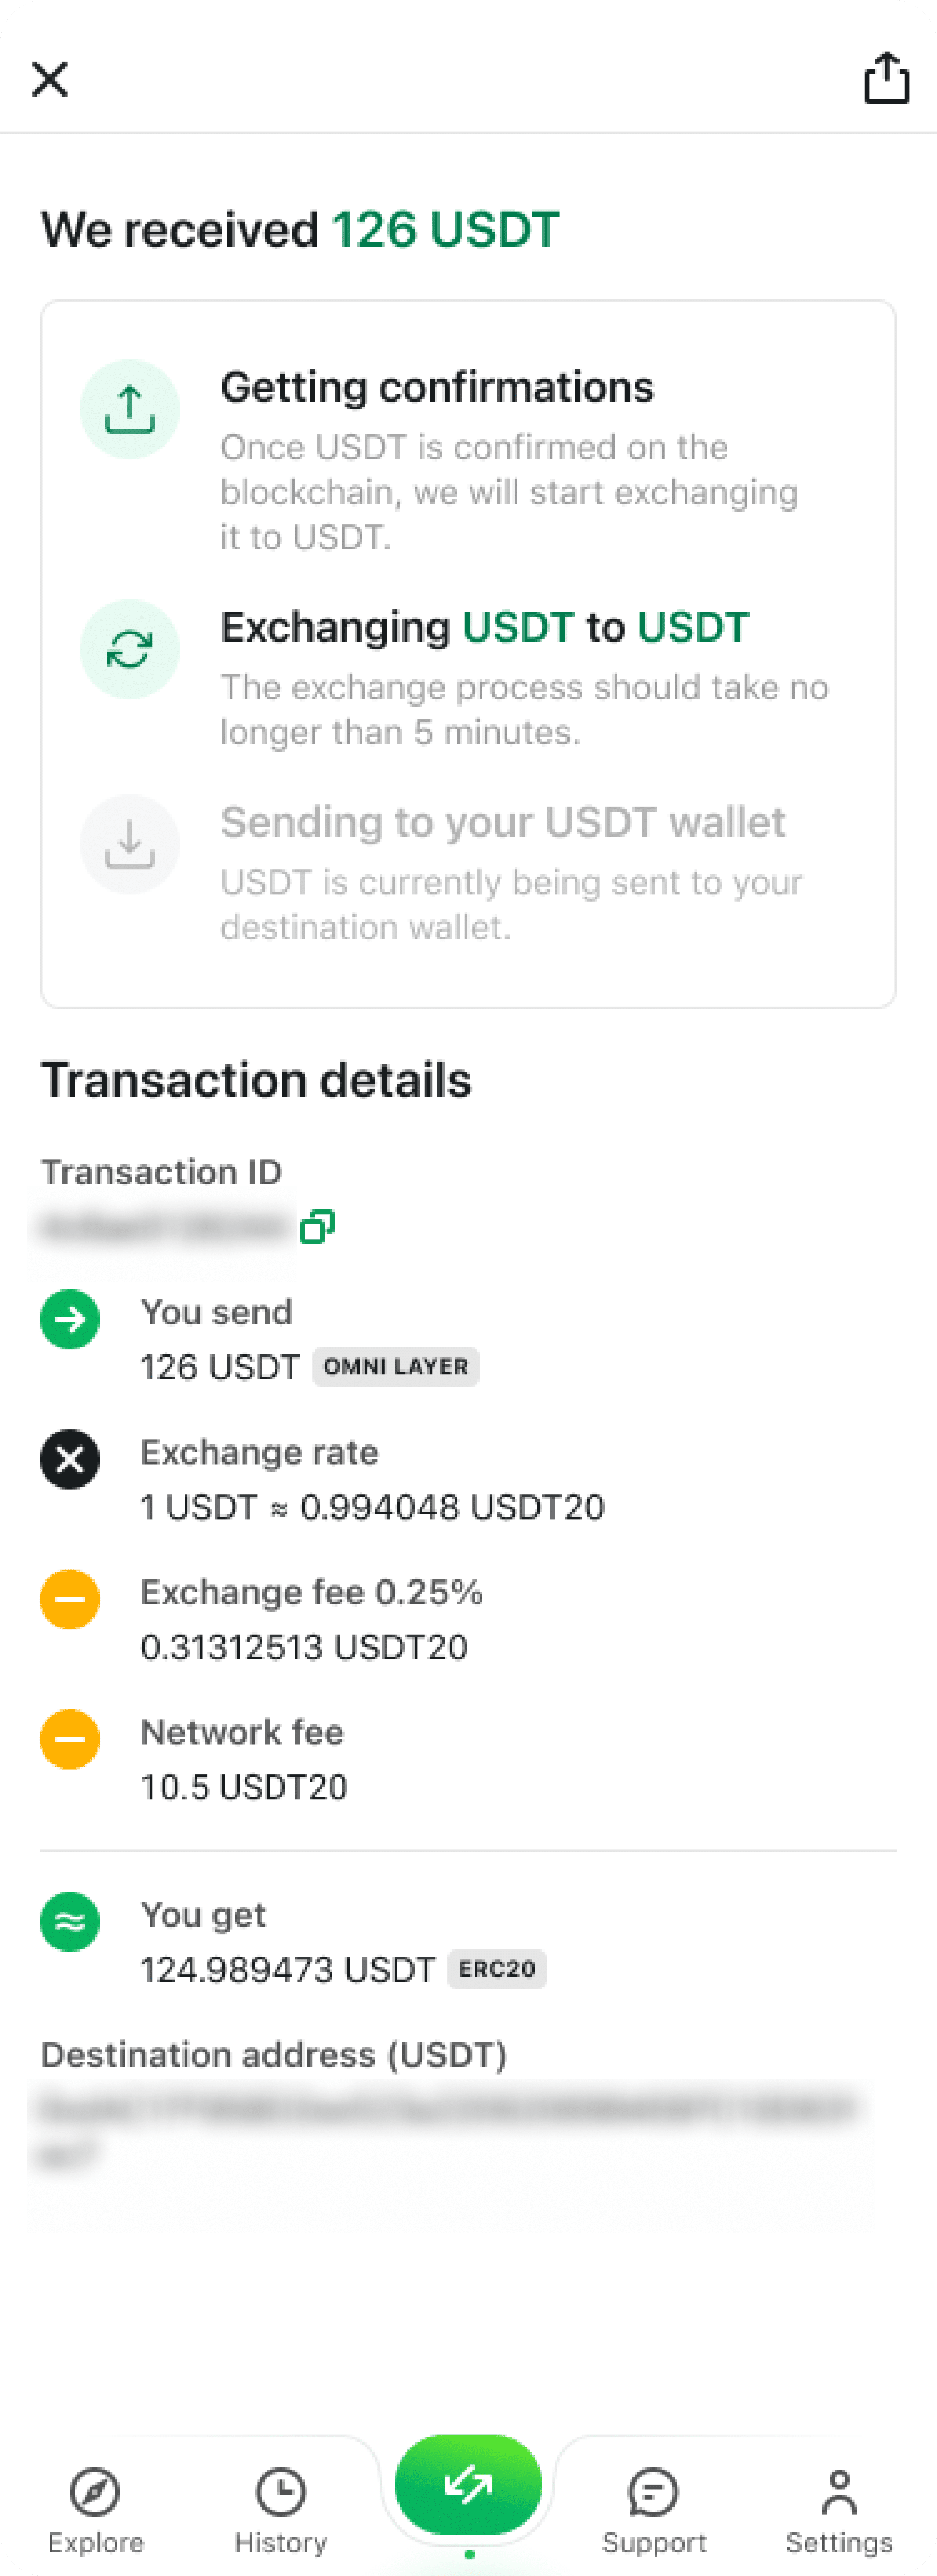
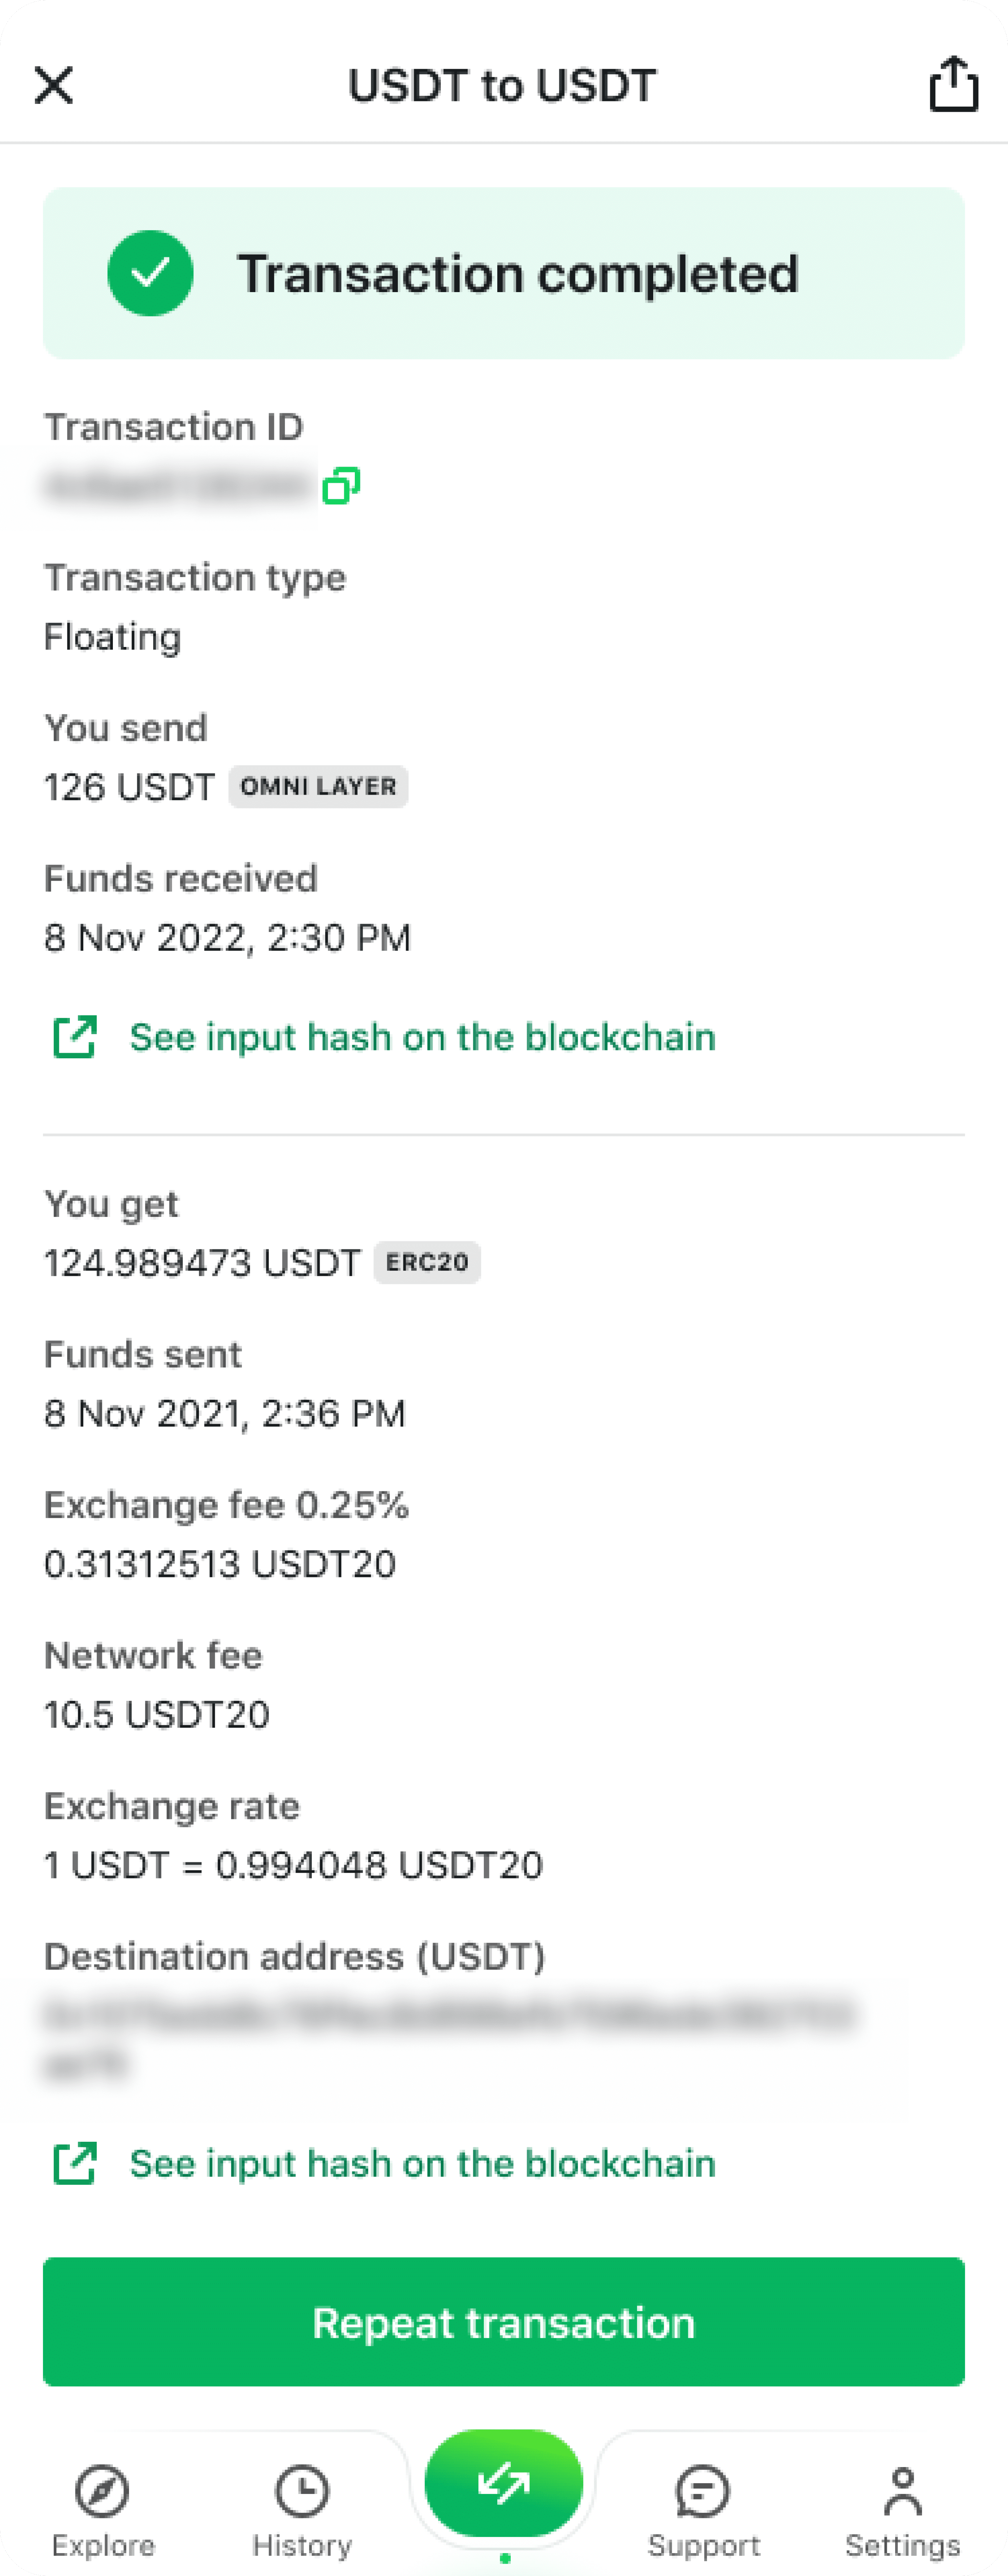
Step 6. Once your funds reach our wallet and the transfer is confirmed, we will initiate the conversion process right away. You can always check your transaction status on the overview screen of that particular order. Please see the example below.
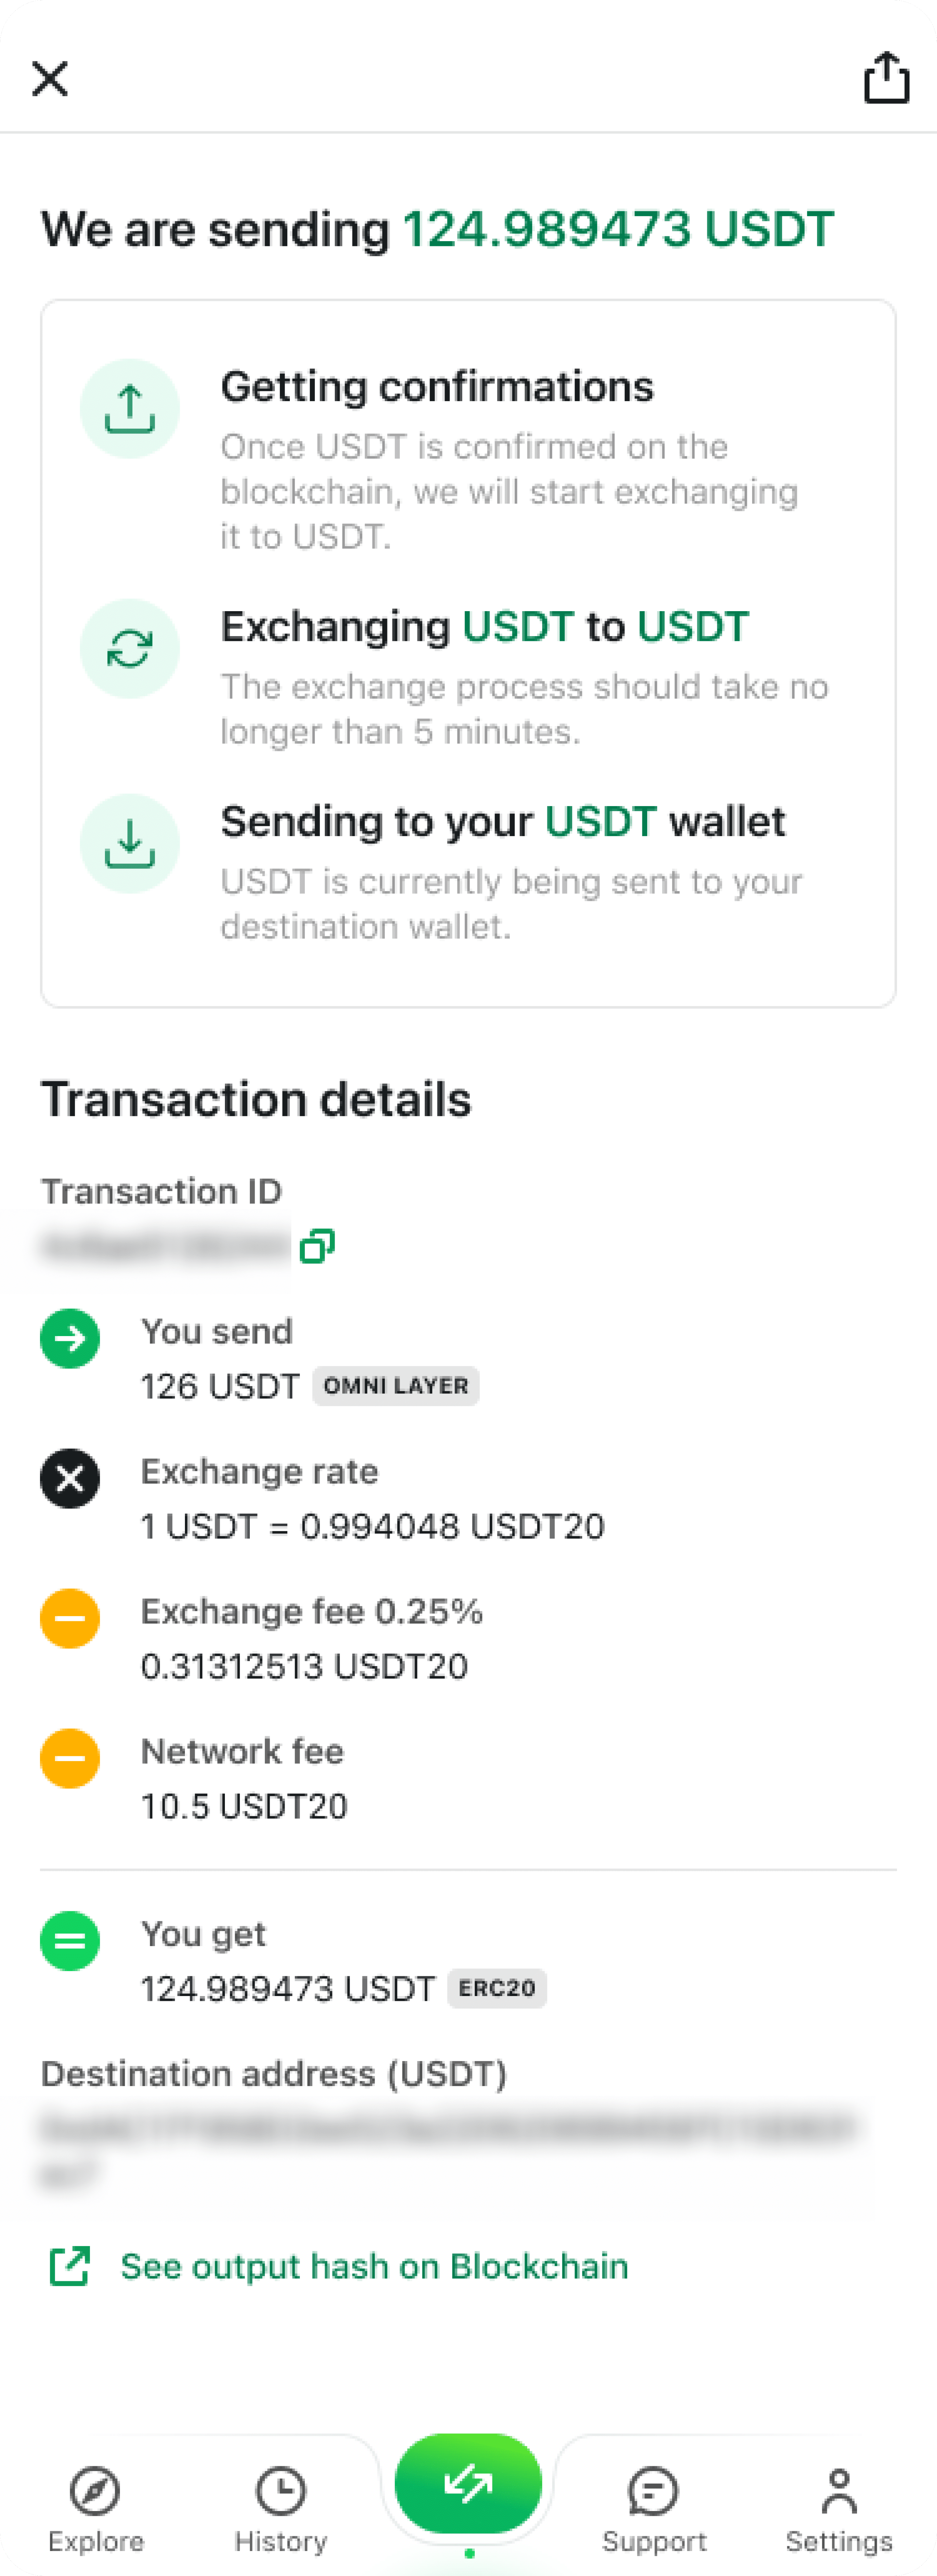
Step 7. The last step of the exchange process involves us sending new coins or tokens to your wallet. If the transaction has a payout hash in its overview in the transaction history, then that means we’ve already sent out your funds. They typically arrive in 15–20 minutes but can take a bit longer if the blockchain is busy.
Once that’s done, the transaction is complete — enjoy your new crypto!
Part 2. Exchange at fixed rates
Step 1. Choose the currencies you want to exchange by tapping the tickers. Then, enter the amount you’d like to exchange. Alternatively, you can also enter the amount you’d like to get in the “You get” field — this way, our system will count the corresponding deposit amount for you. Please note that fixed-rate exchanges are only available for cryptocurrencies that have a small “lock” icon next to their name in the drop-down menu.
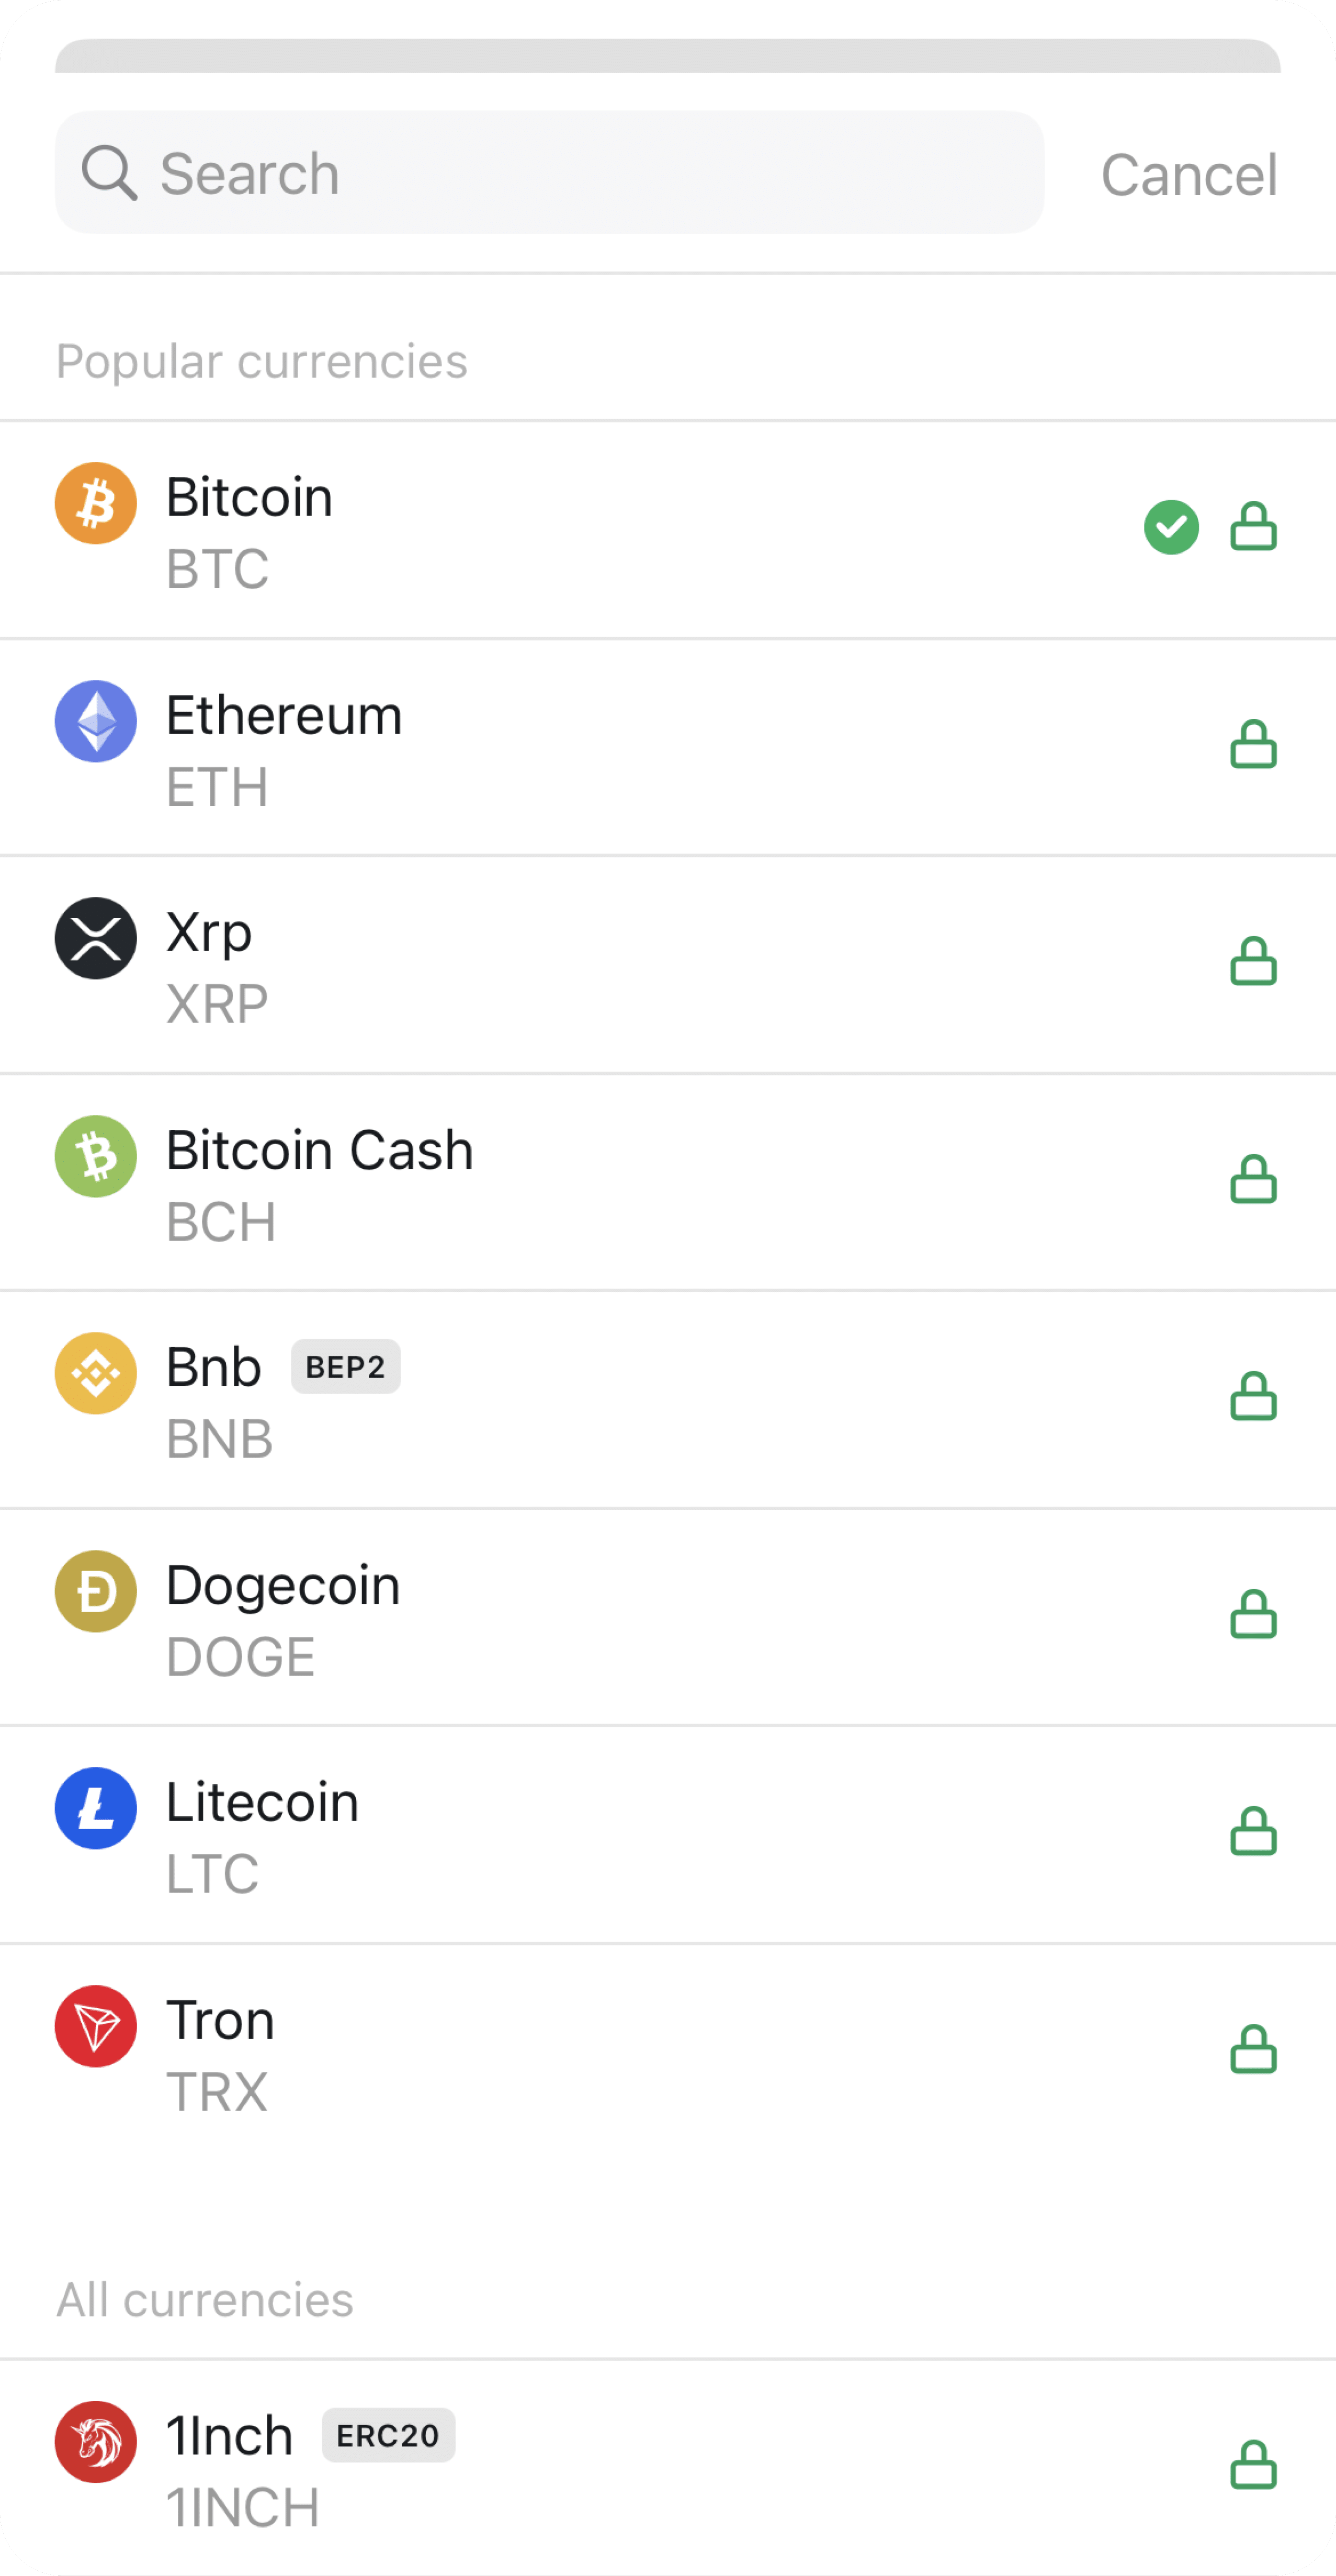
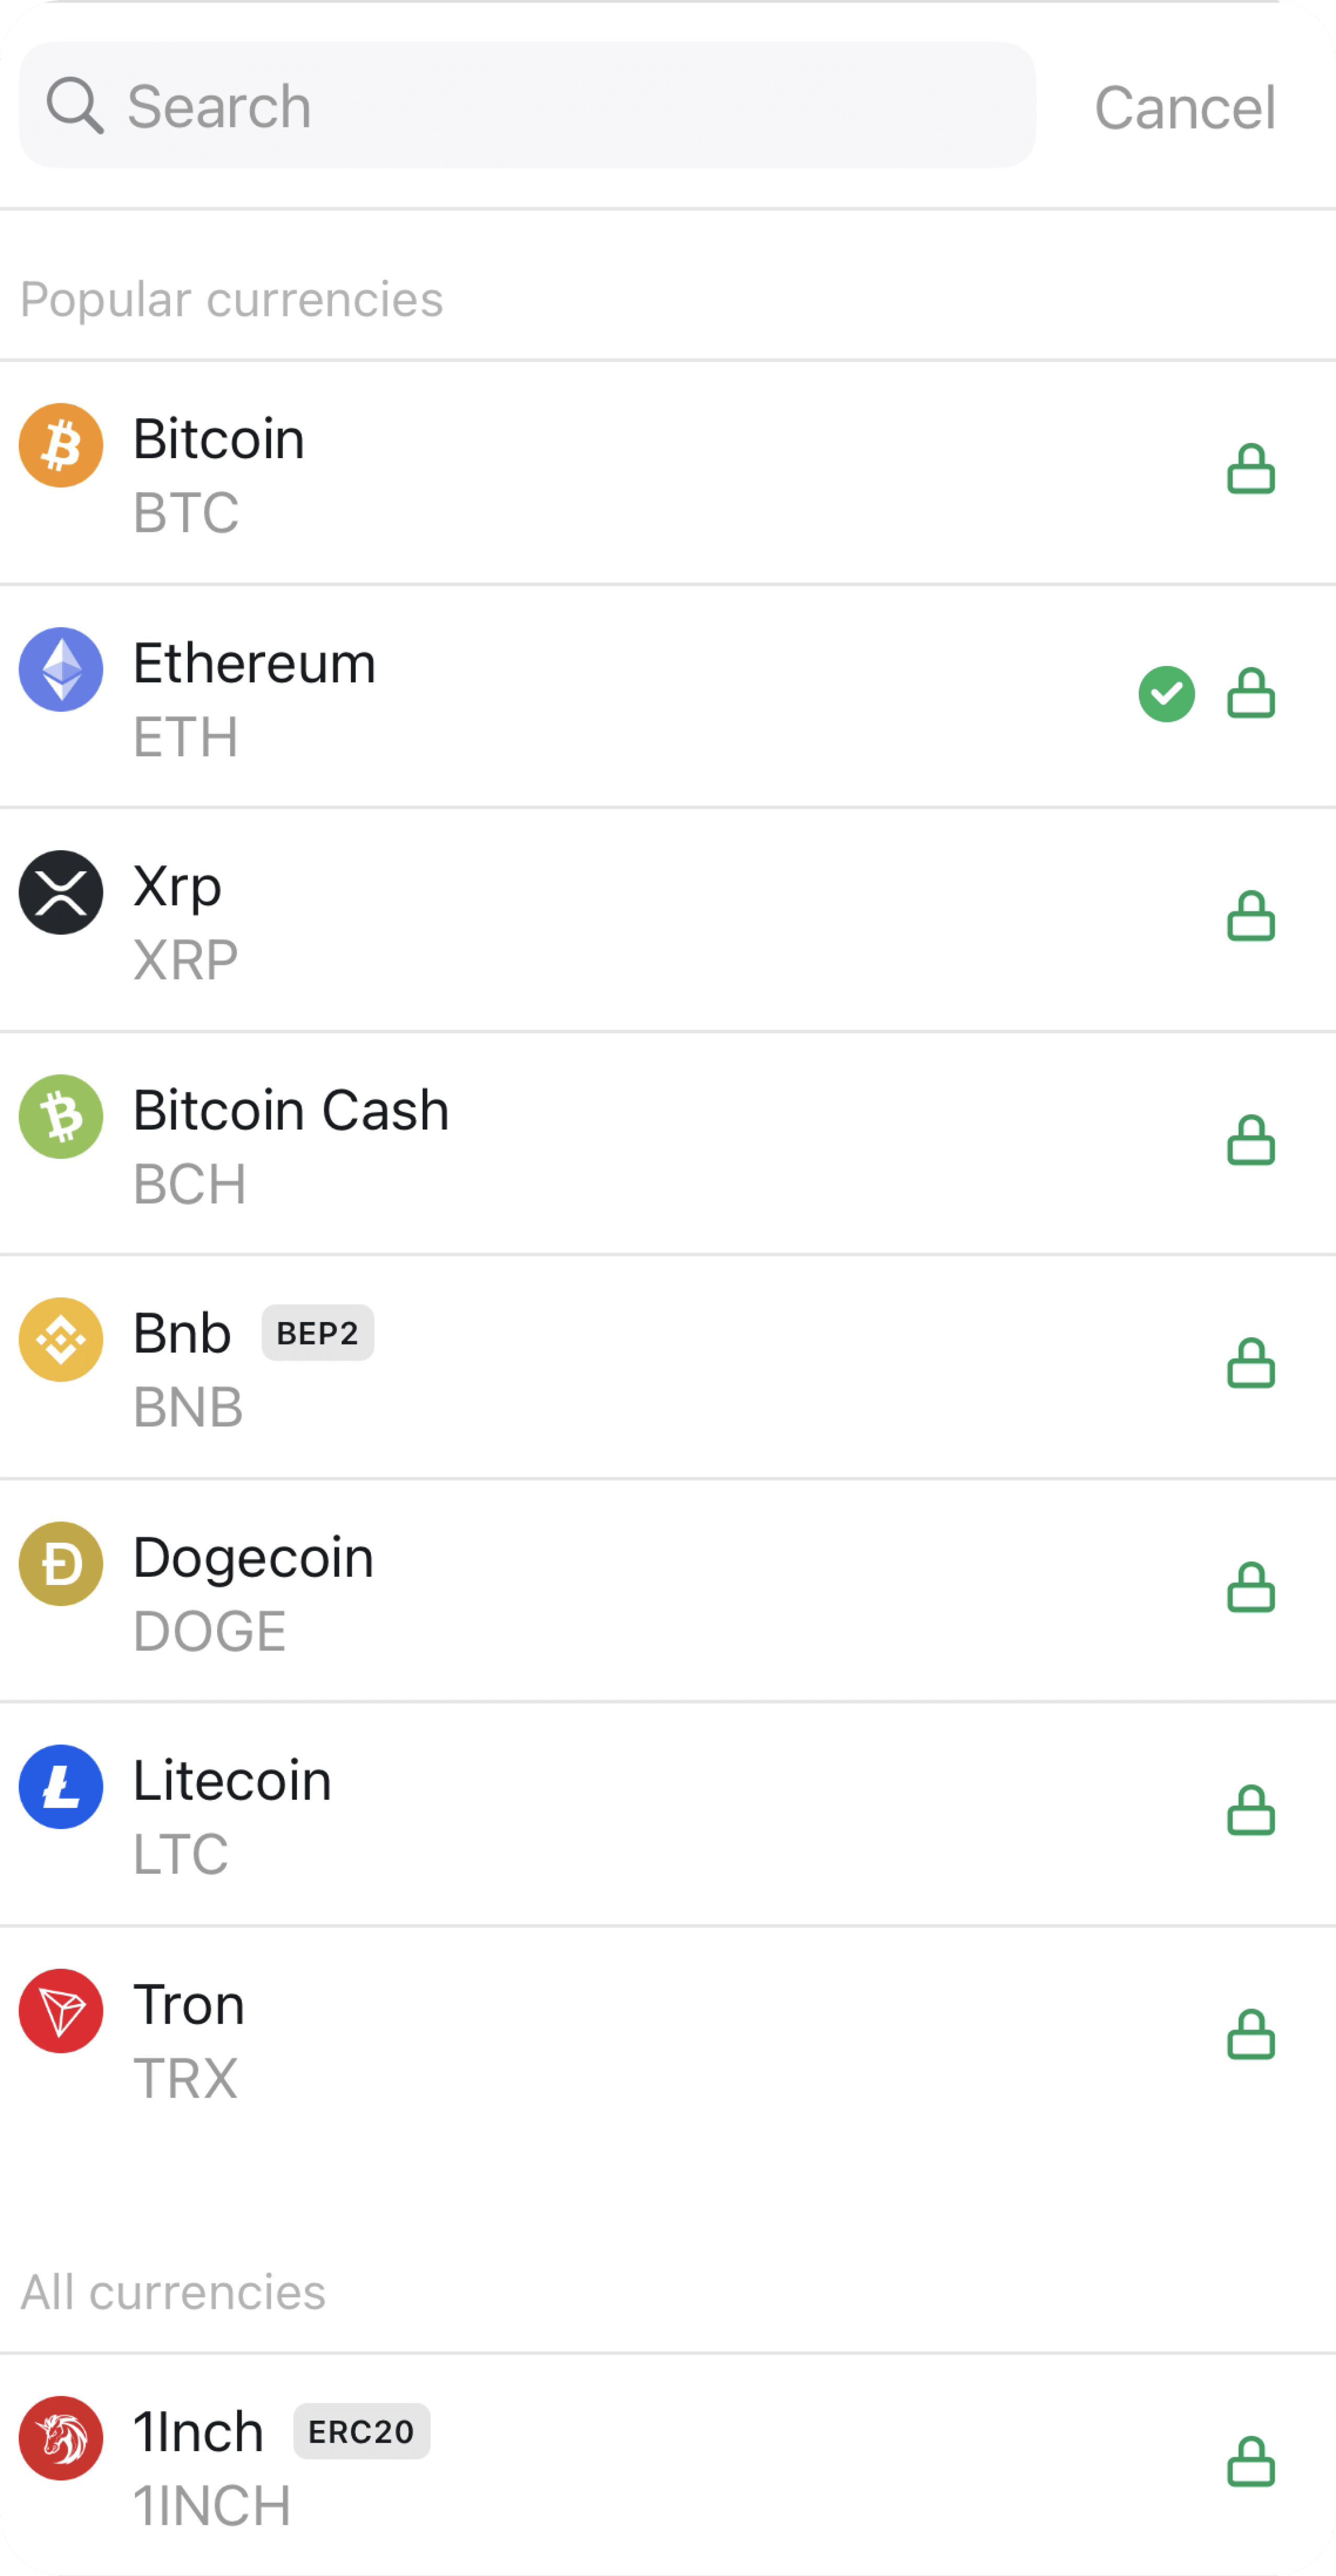
Step 2. Tap the “Fixed exchange rate” option. This will ensure that your rate will be locked when you press Confirm on the Checkout screen.
Step 3. Fill in the destination address of the crypto you want to get. If it’s not your first time using our app, your address is most likely saved in our system. You can choose it from the list.
For fixed-rate exchanges, you will also need to enter a refund address — it should support the cryptocurrency you will be paying with.
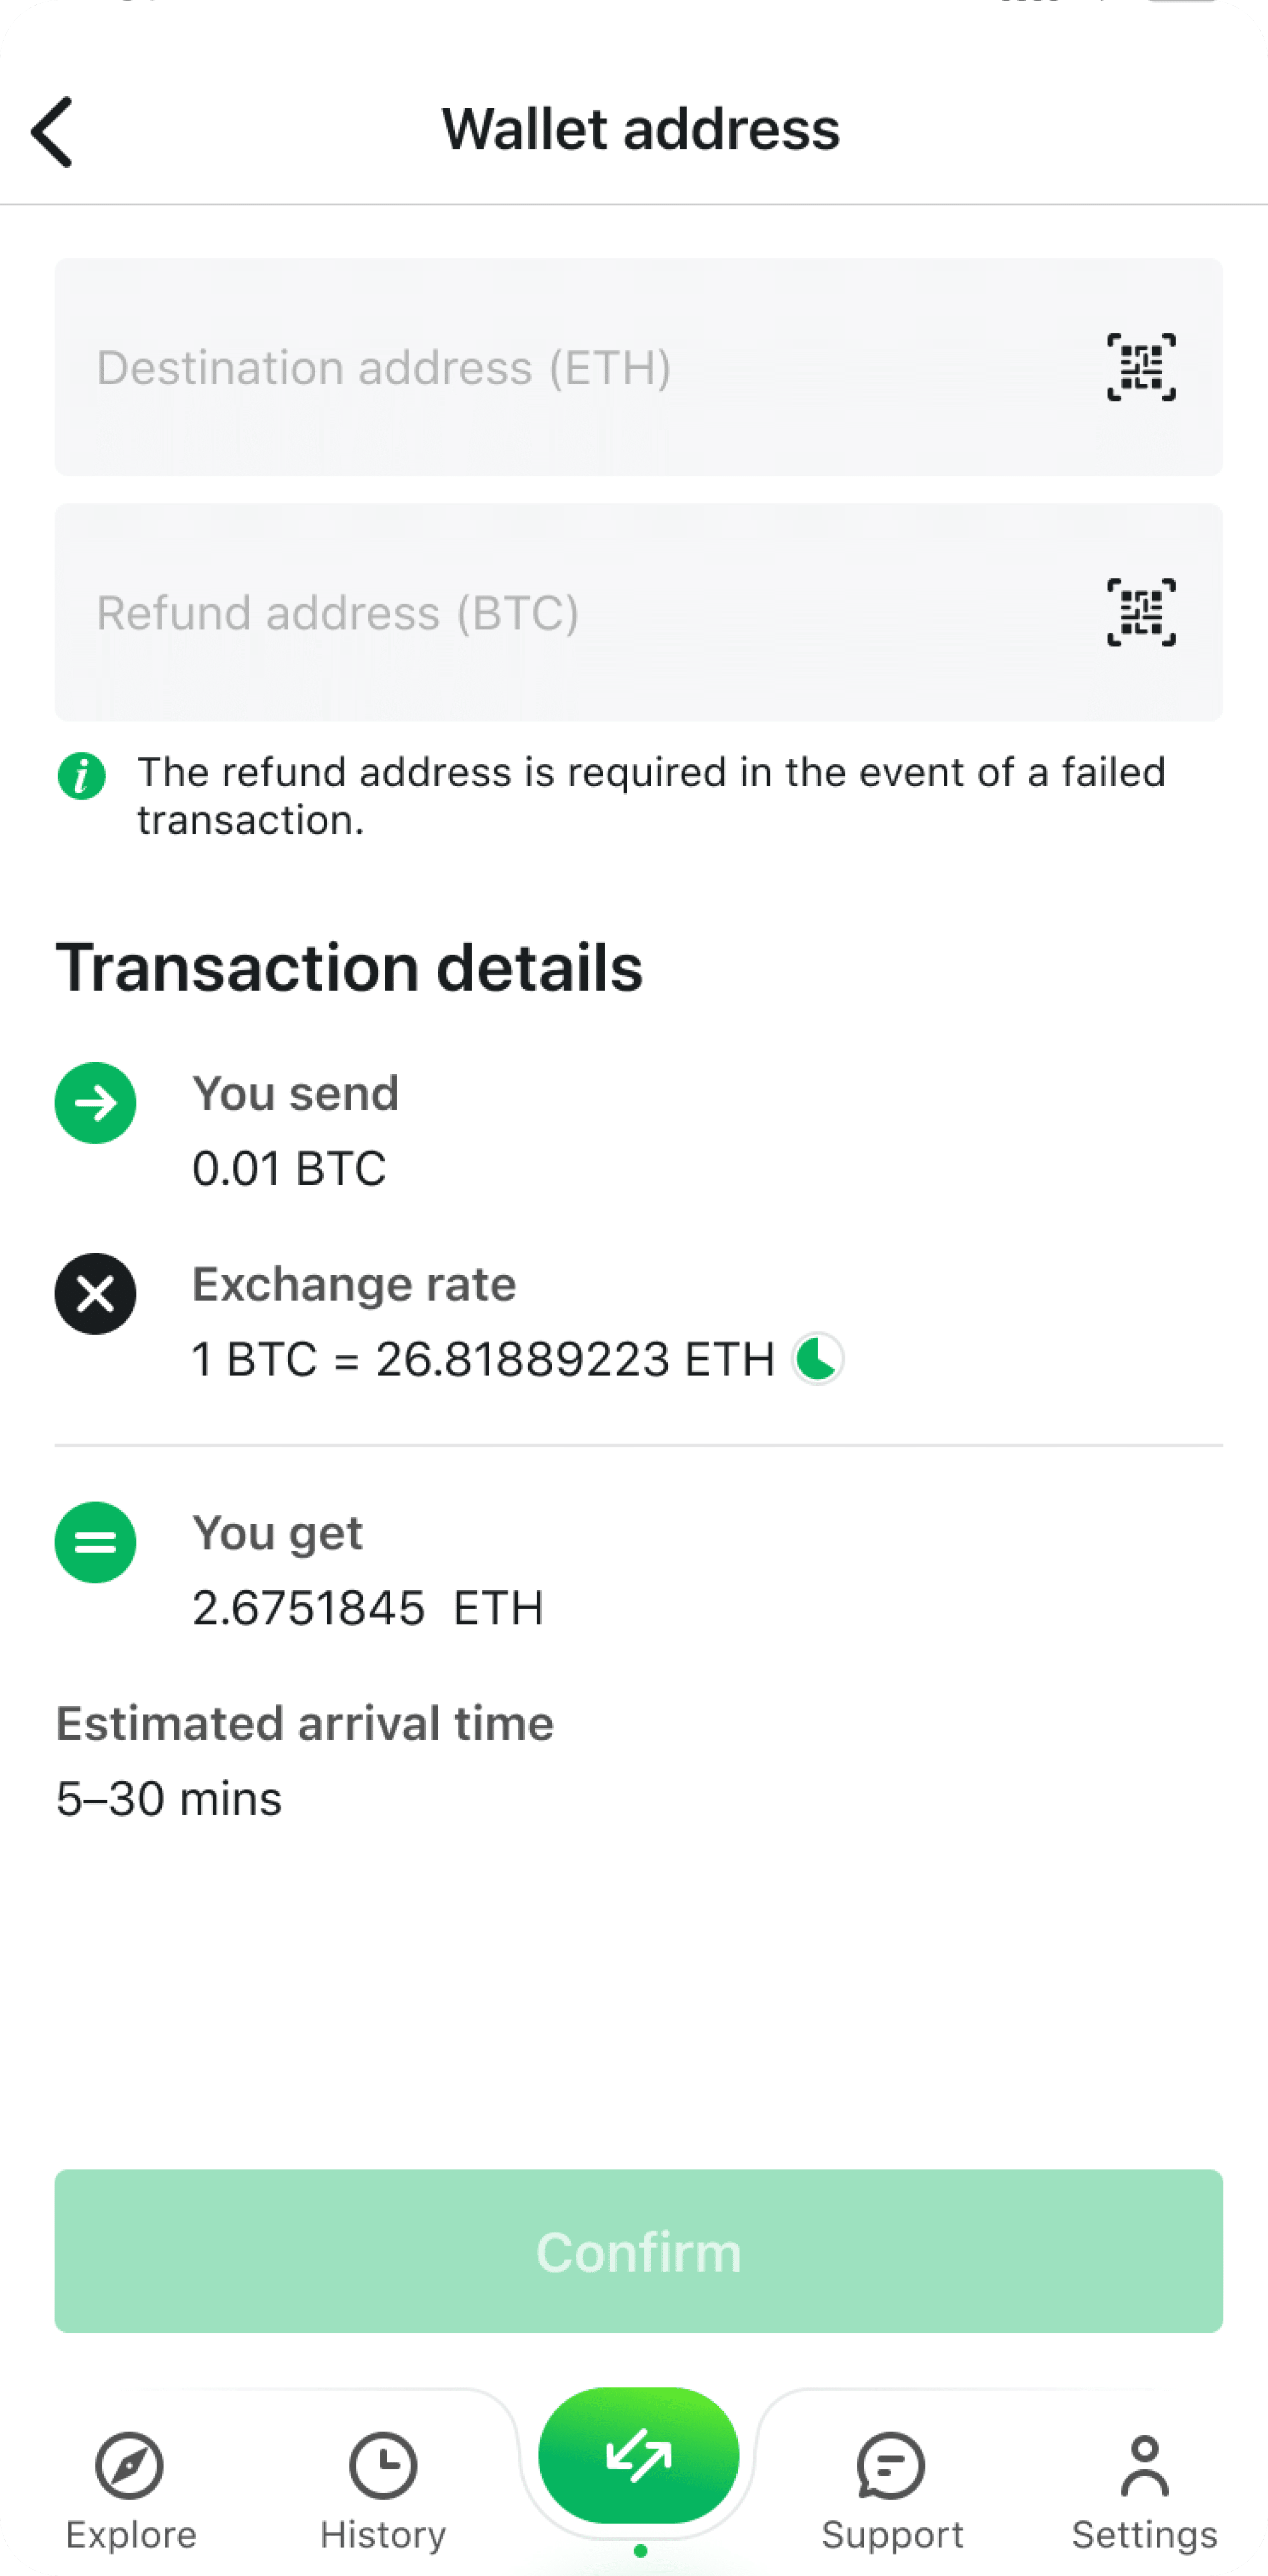
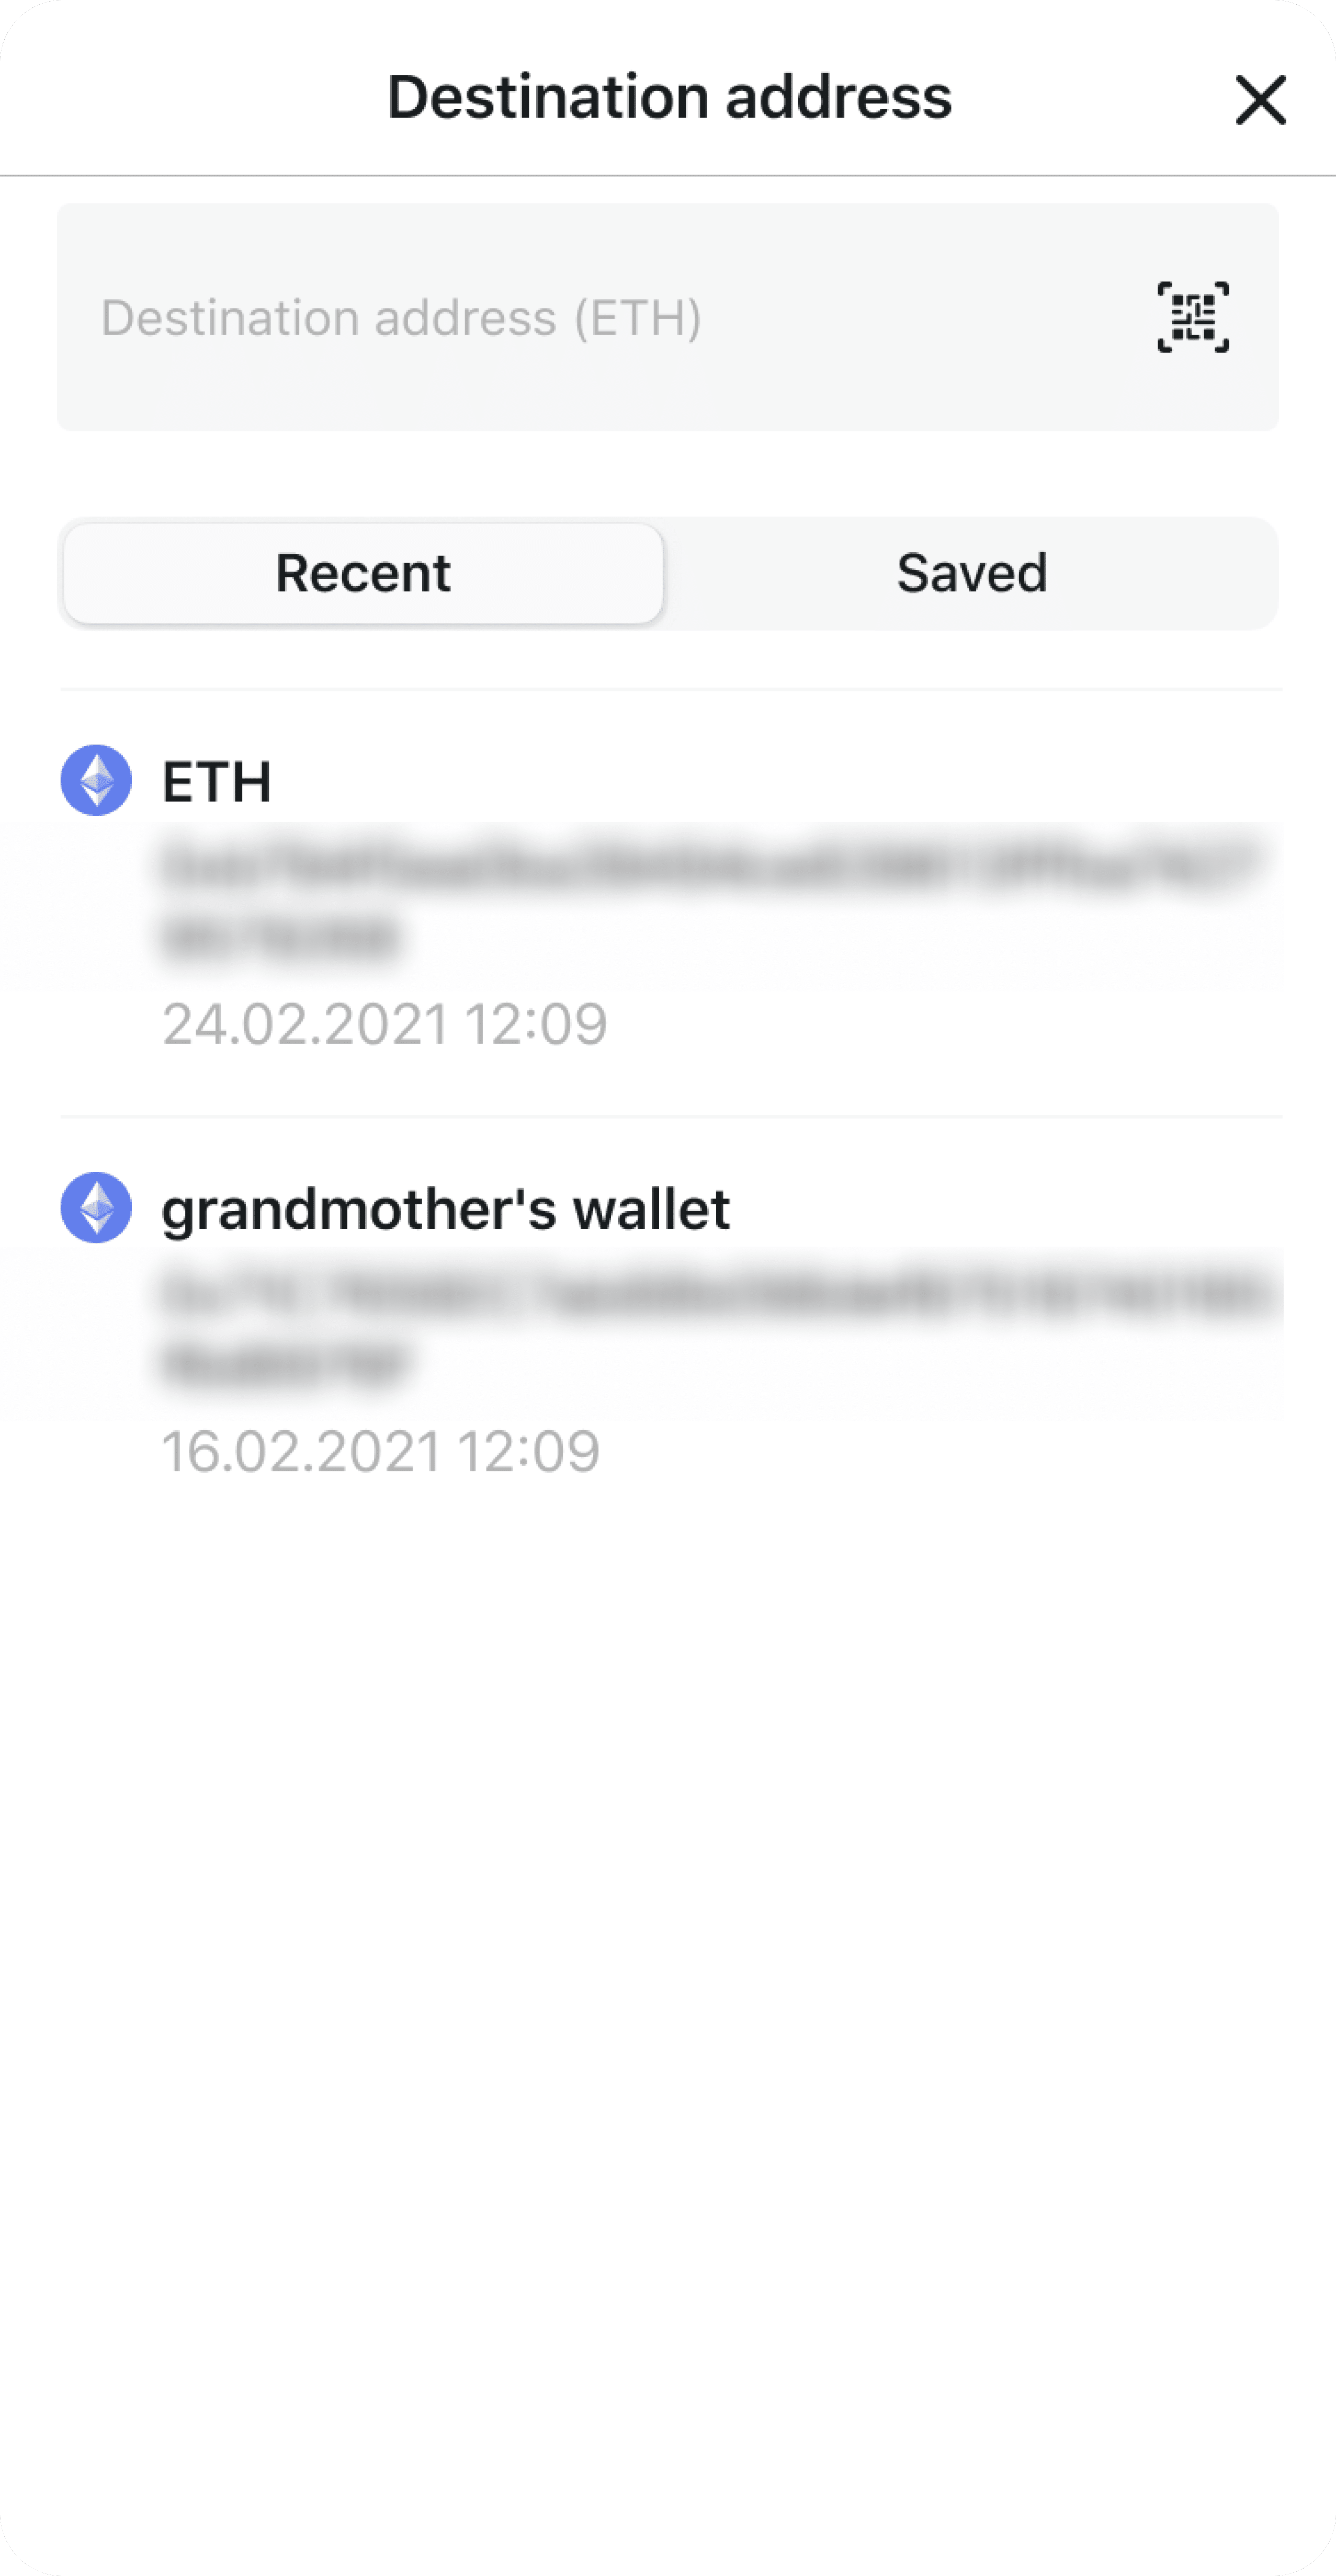
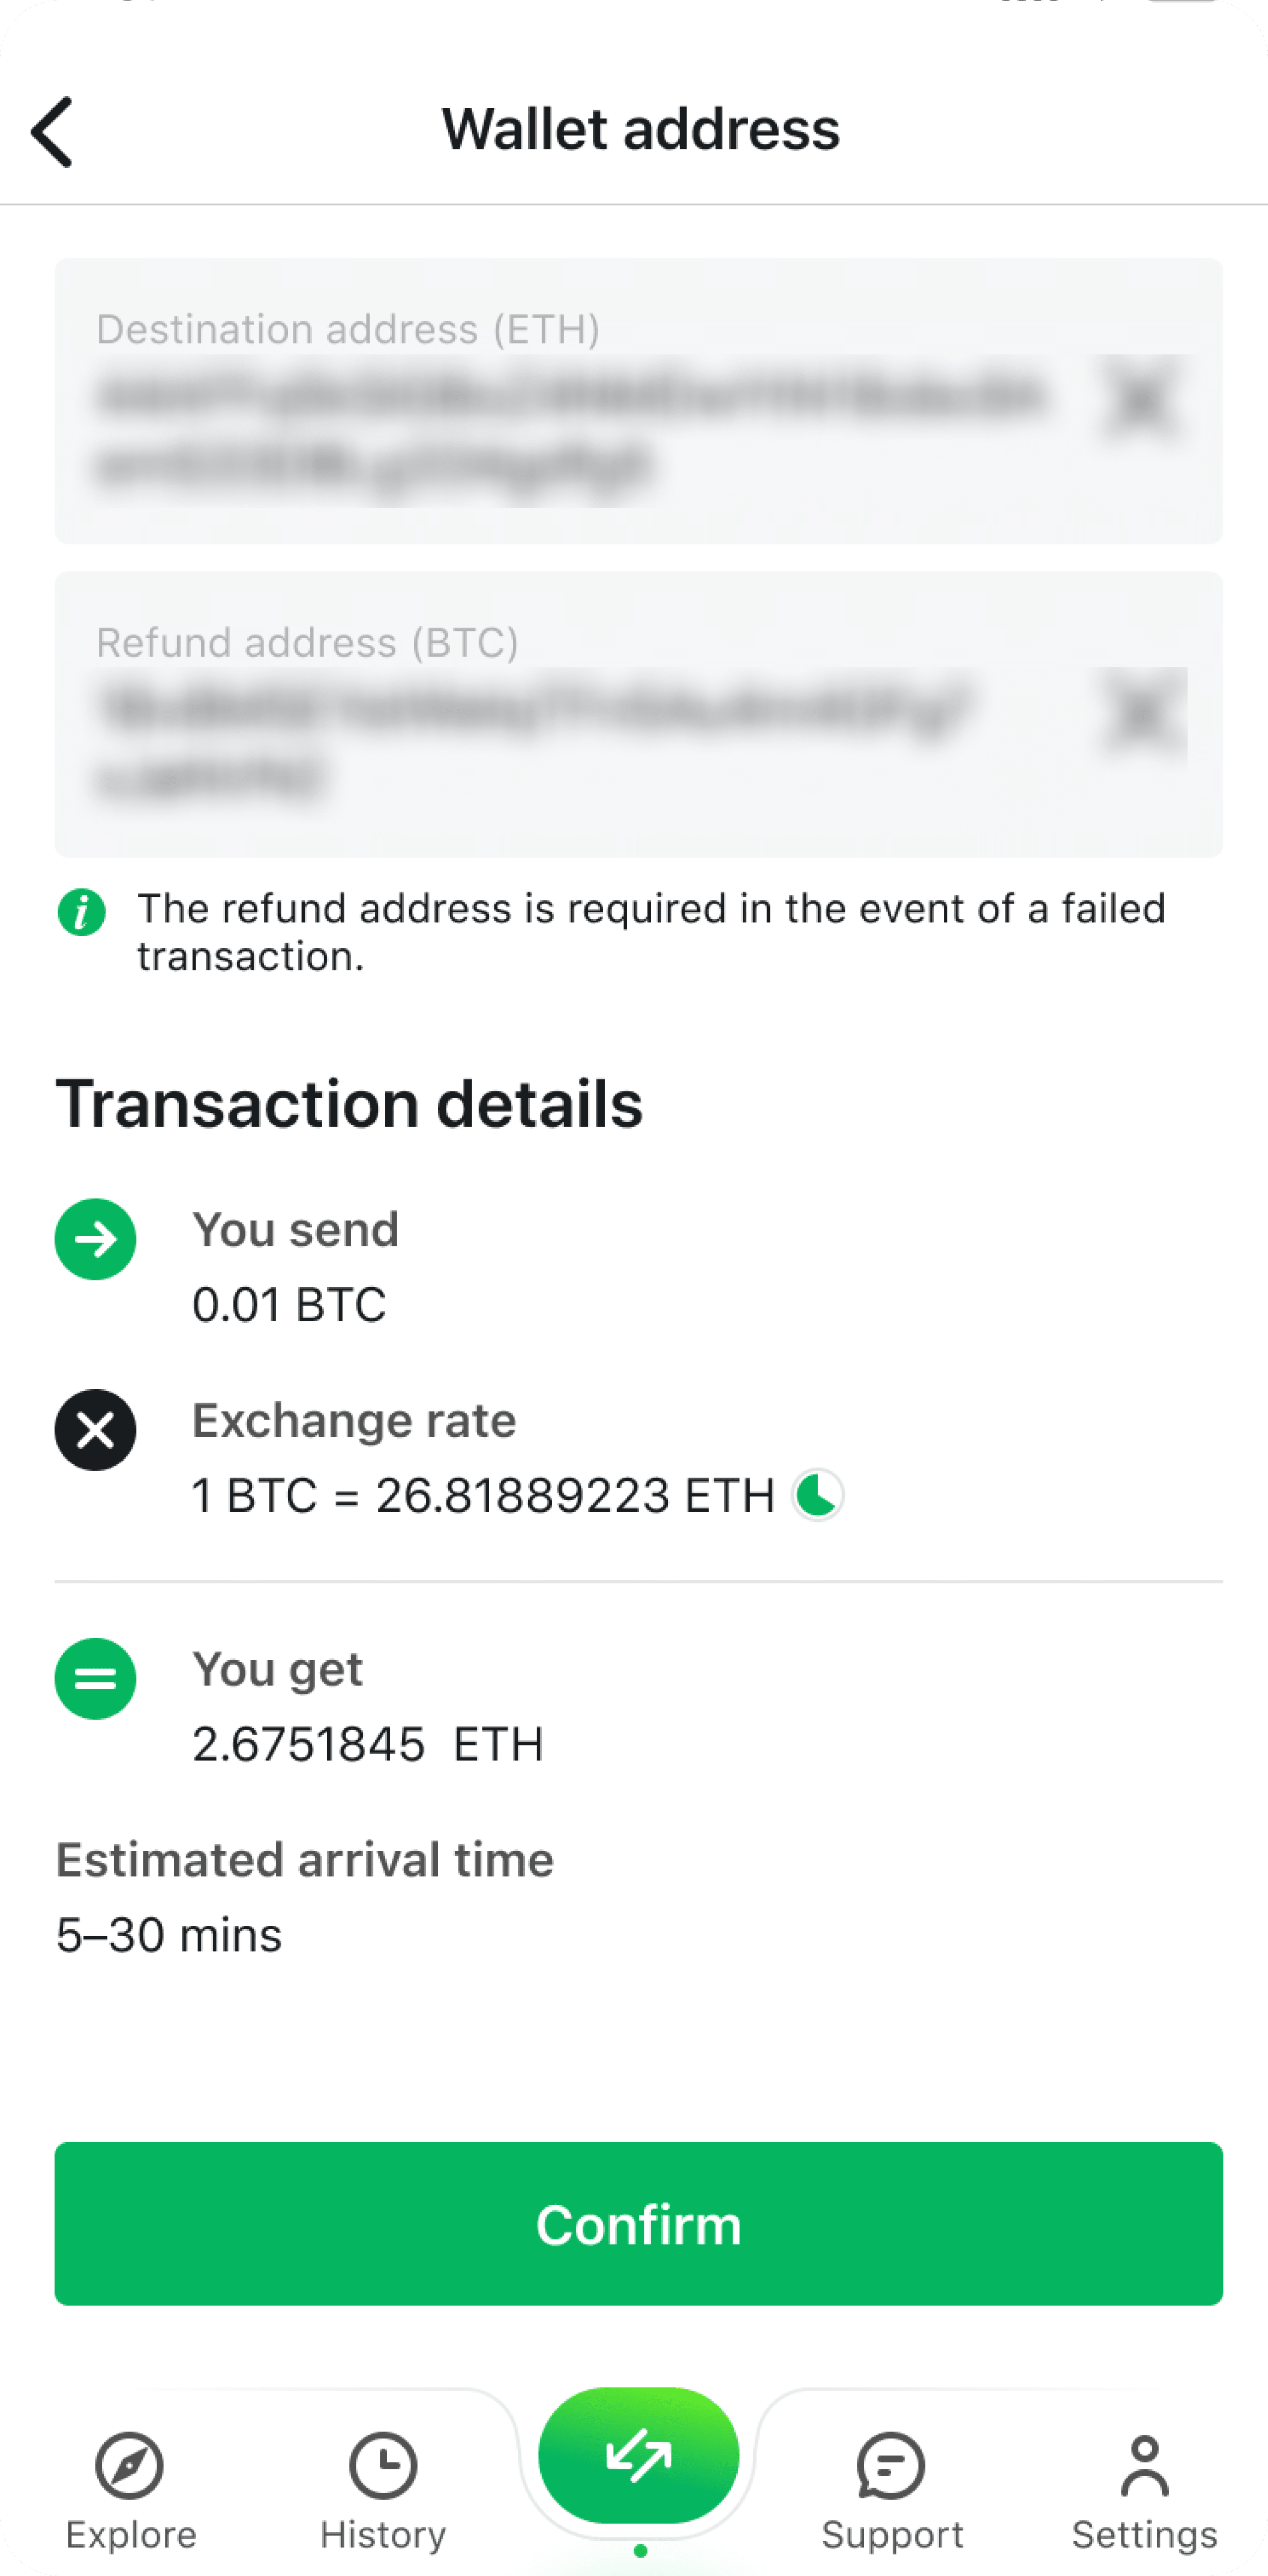
Step 4. Double-check the destination address — don’t forget to make sure that it supports not only the coin/token you’re buying but also its specific network type.
In some cases, you might also have to enter a Memo ID. It is an extra identifier for making transactions on certain chains — you can see the full list of the networks that require it below, in the “What is Memo.ID?” section.
Pay attention to the network fee and arrival time. If everything is to your satisfaction, press Confirm.
Step 5. We will provide you with a crypto wallet address to which you must send your funds. Once you get it, you will only have 15 (in some exceptional cases, 20) minutes to proceed with the transfer. There will be a countdown on the screen.
Don’t send funds to expired addresses. If you’re not careful, the address — and the QR code — can expire. Do not send funds if the transaction has expired; create a new one instead.
Send all your funds in a single transaction. Please note that the funds must be sent in one single transaction. If you are aware you sent less than you were supposed to or are unsure whether the funds have been transferred to our wallet, don’t immediately send them again! Please wait for your transaction status to be updated or create a new transaction instead.
Account for fees when sending us funds. Make sure we receive the exact amount of crypto we have requested from you.
Pay attention to Memo.ID and network type requirements. In some cases, we might ask you to use extra details (a Memo.ID, a destination tag, etc.). Please make sure to include it, and don’t forget that the crypto you send to us has to be on the network you have indicated when initiating the transaction.
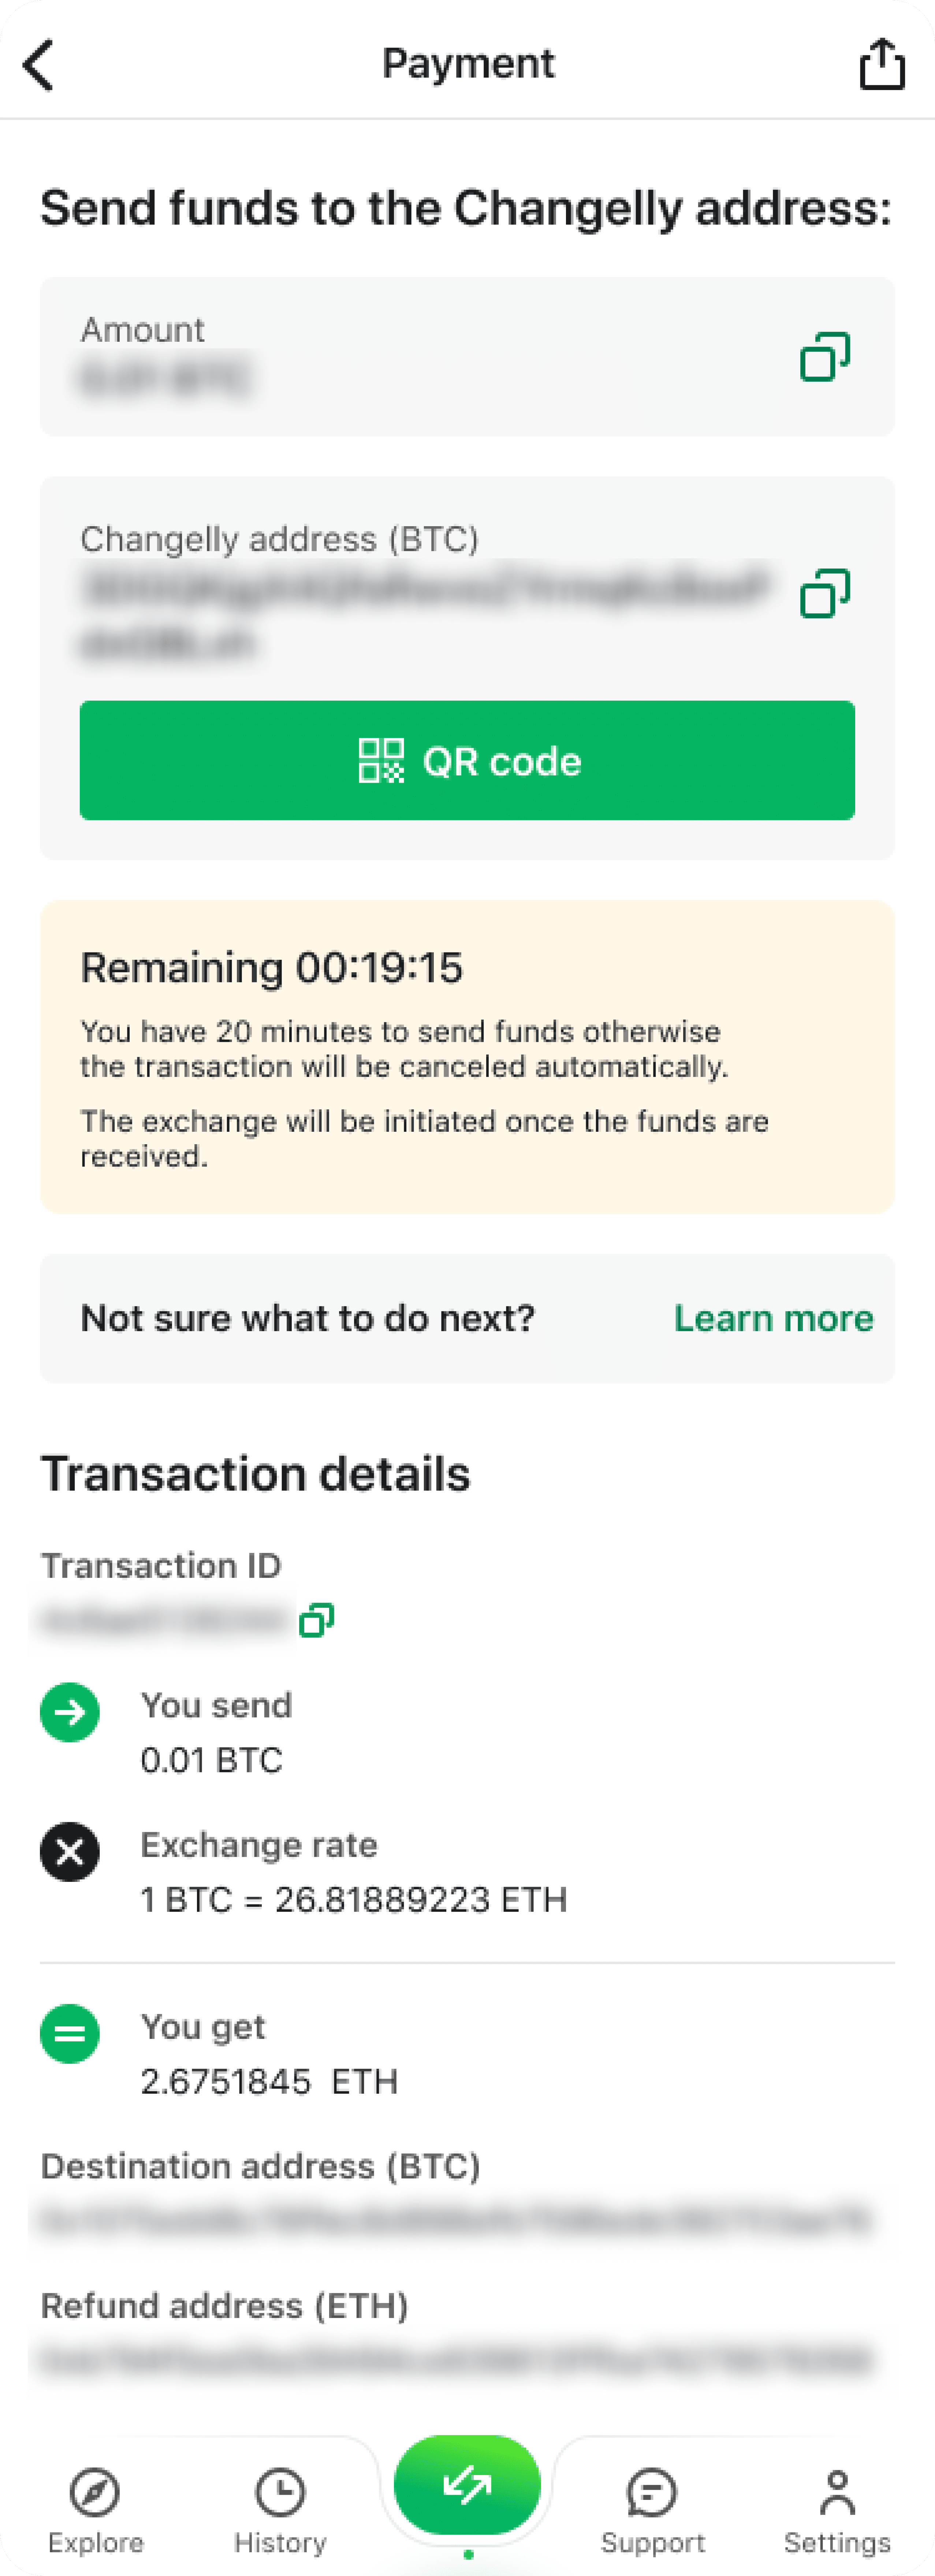
If the amount we actually receive from you differs from the amount you input when creating the transaction, your transaction will most likely be rejected. In this case, the received money will be refunded, less the network fee. Please ensure that the amount we receive from you matches the input amount you specified for your transaction.
Step 6. Once your funds reach our wallet and the transfer is confirmed, we will initiate the conversion process right away. You can always check your transaction status on the overview screen of that particular order. Please see the example below.
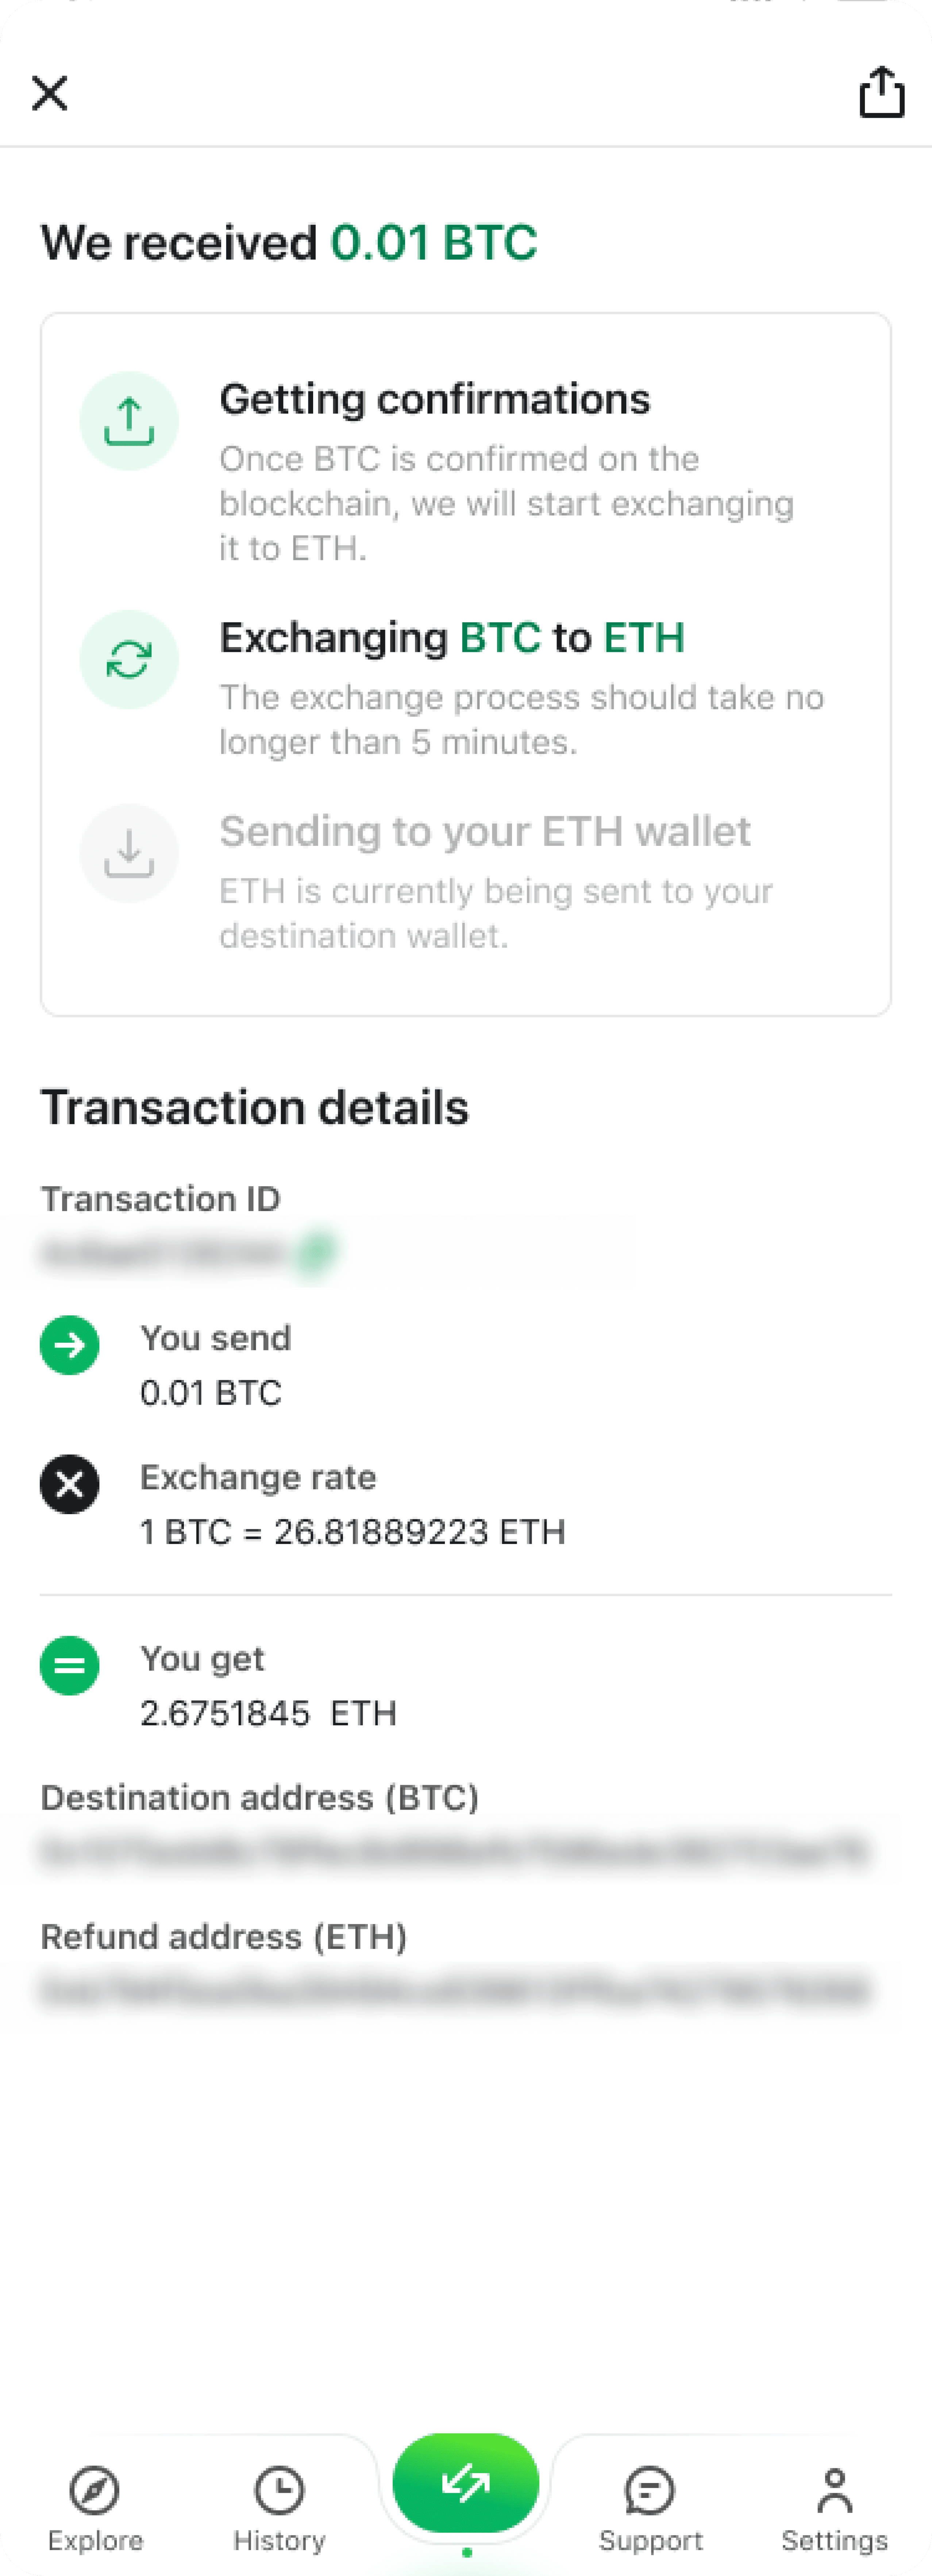
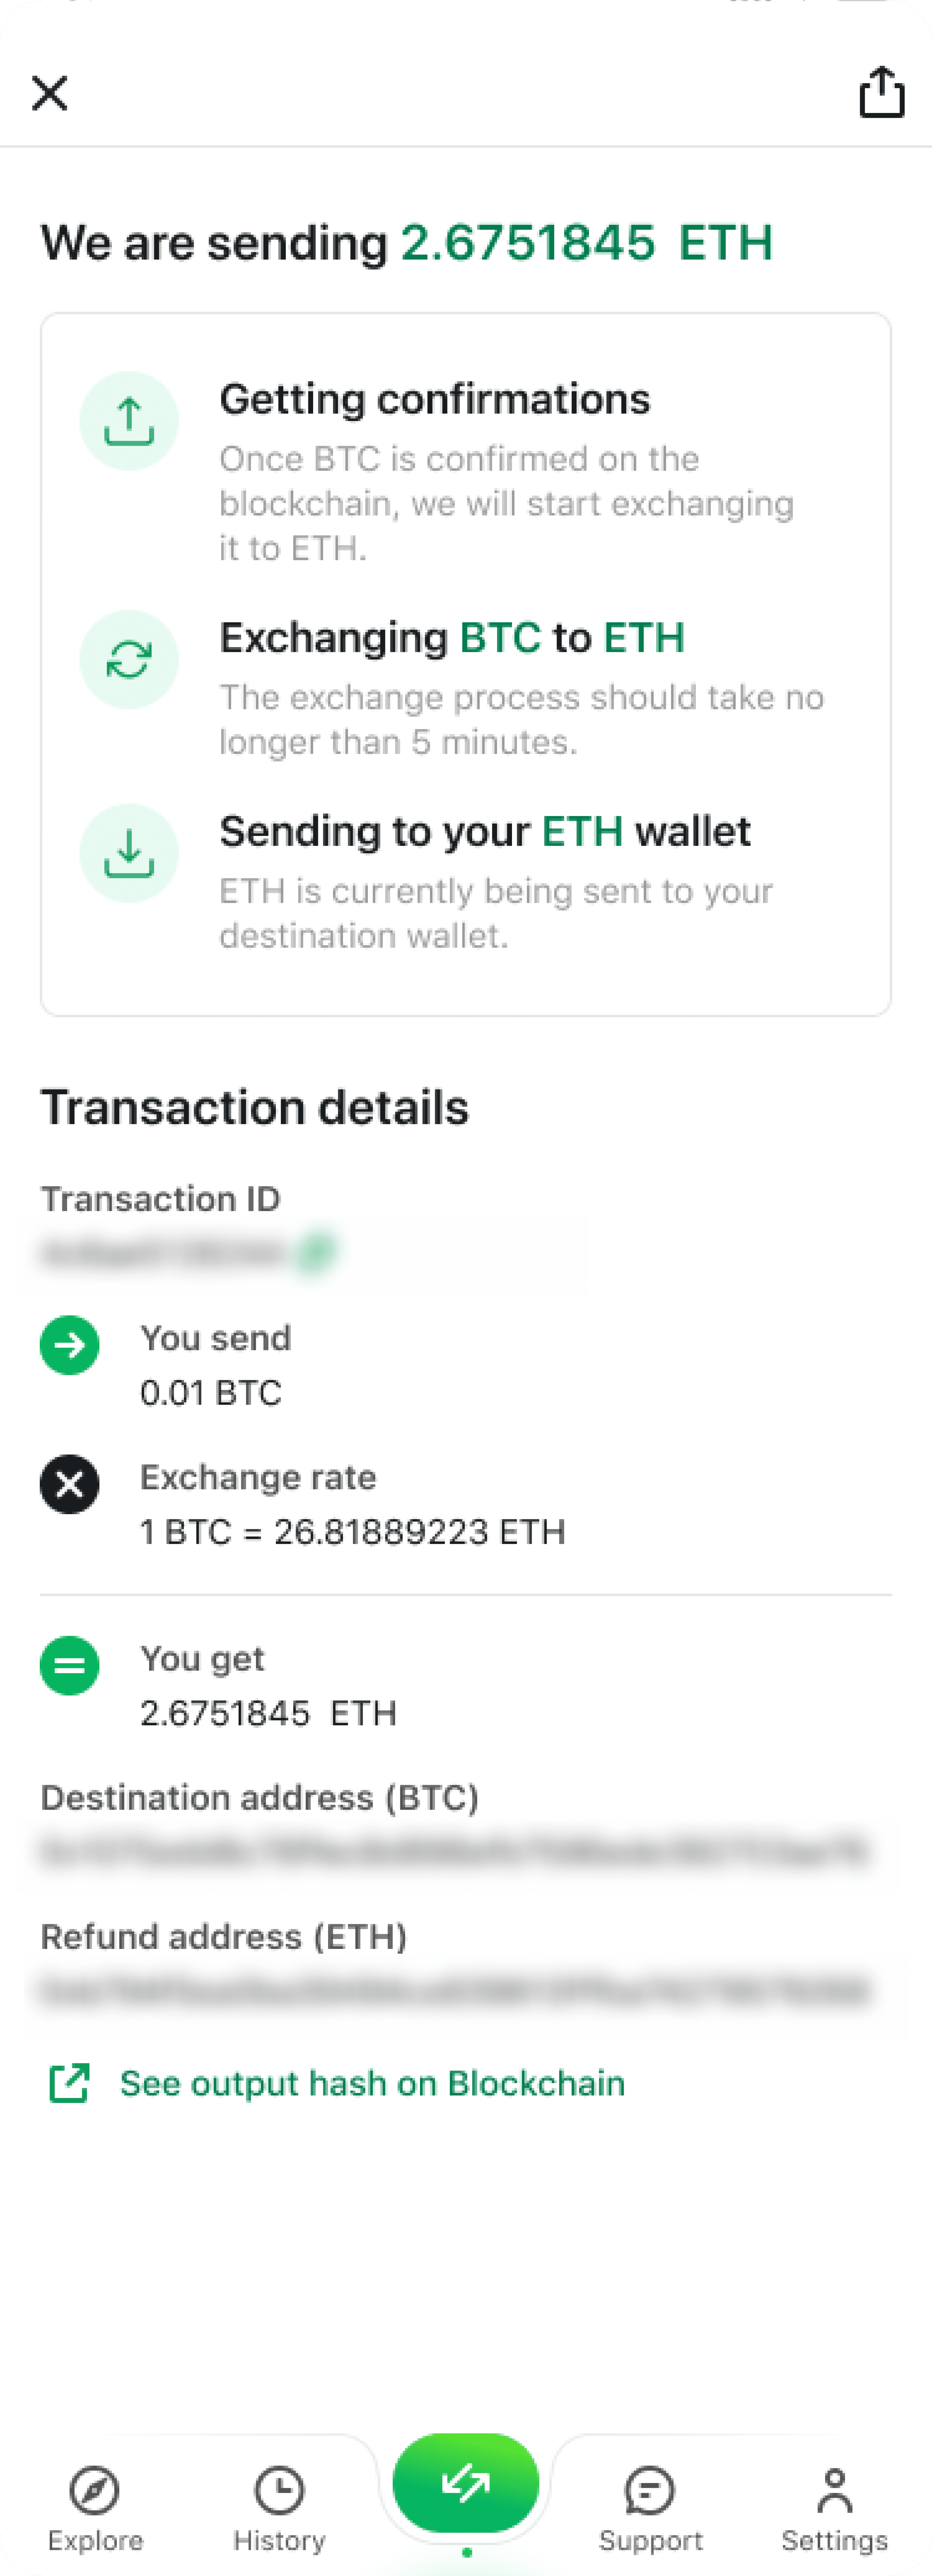
Step 7. The last step of the exchange process involves us sending new coins or tokens to your wallet. If the transaction has a payout hash in its overview in the transaction history, then that means we’ve already sent out your funds. They typically arrive in 15–20 minutes but can take a bit longer if the blockchain is busy.
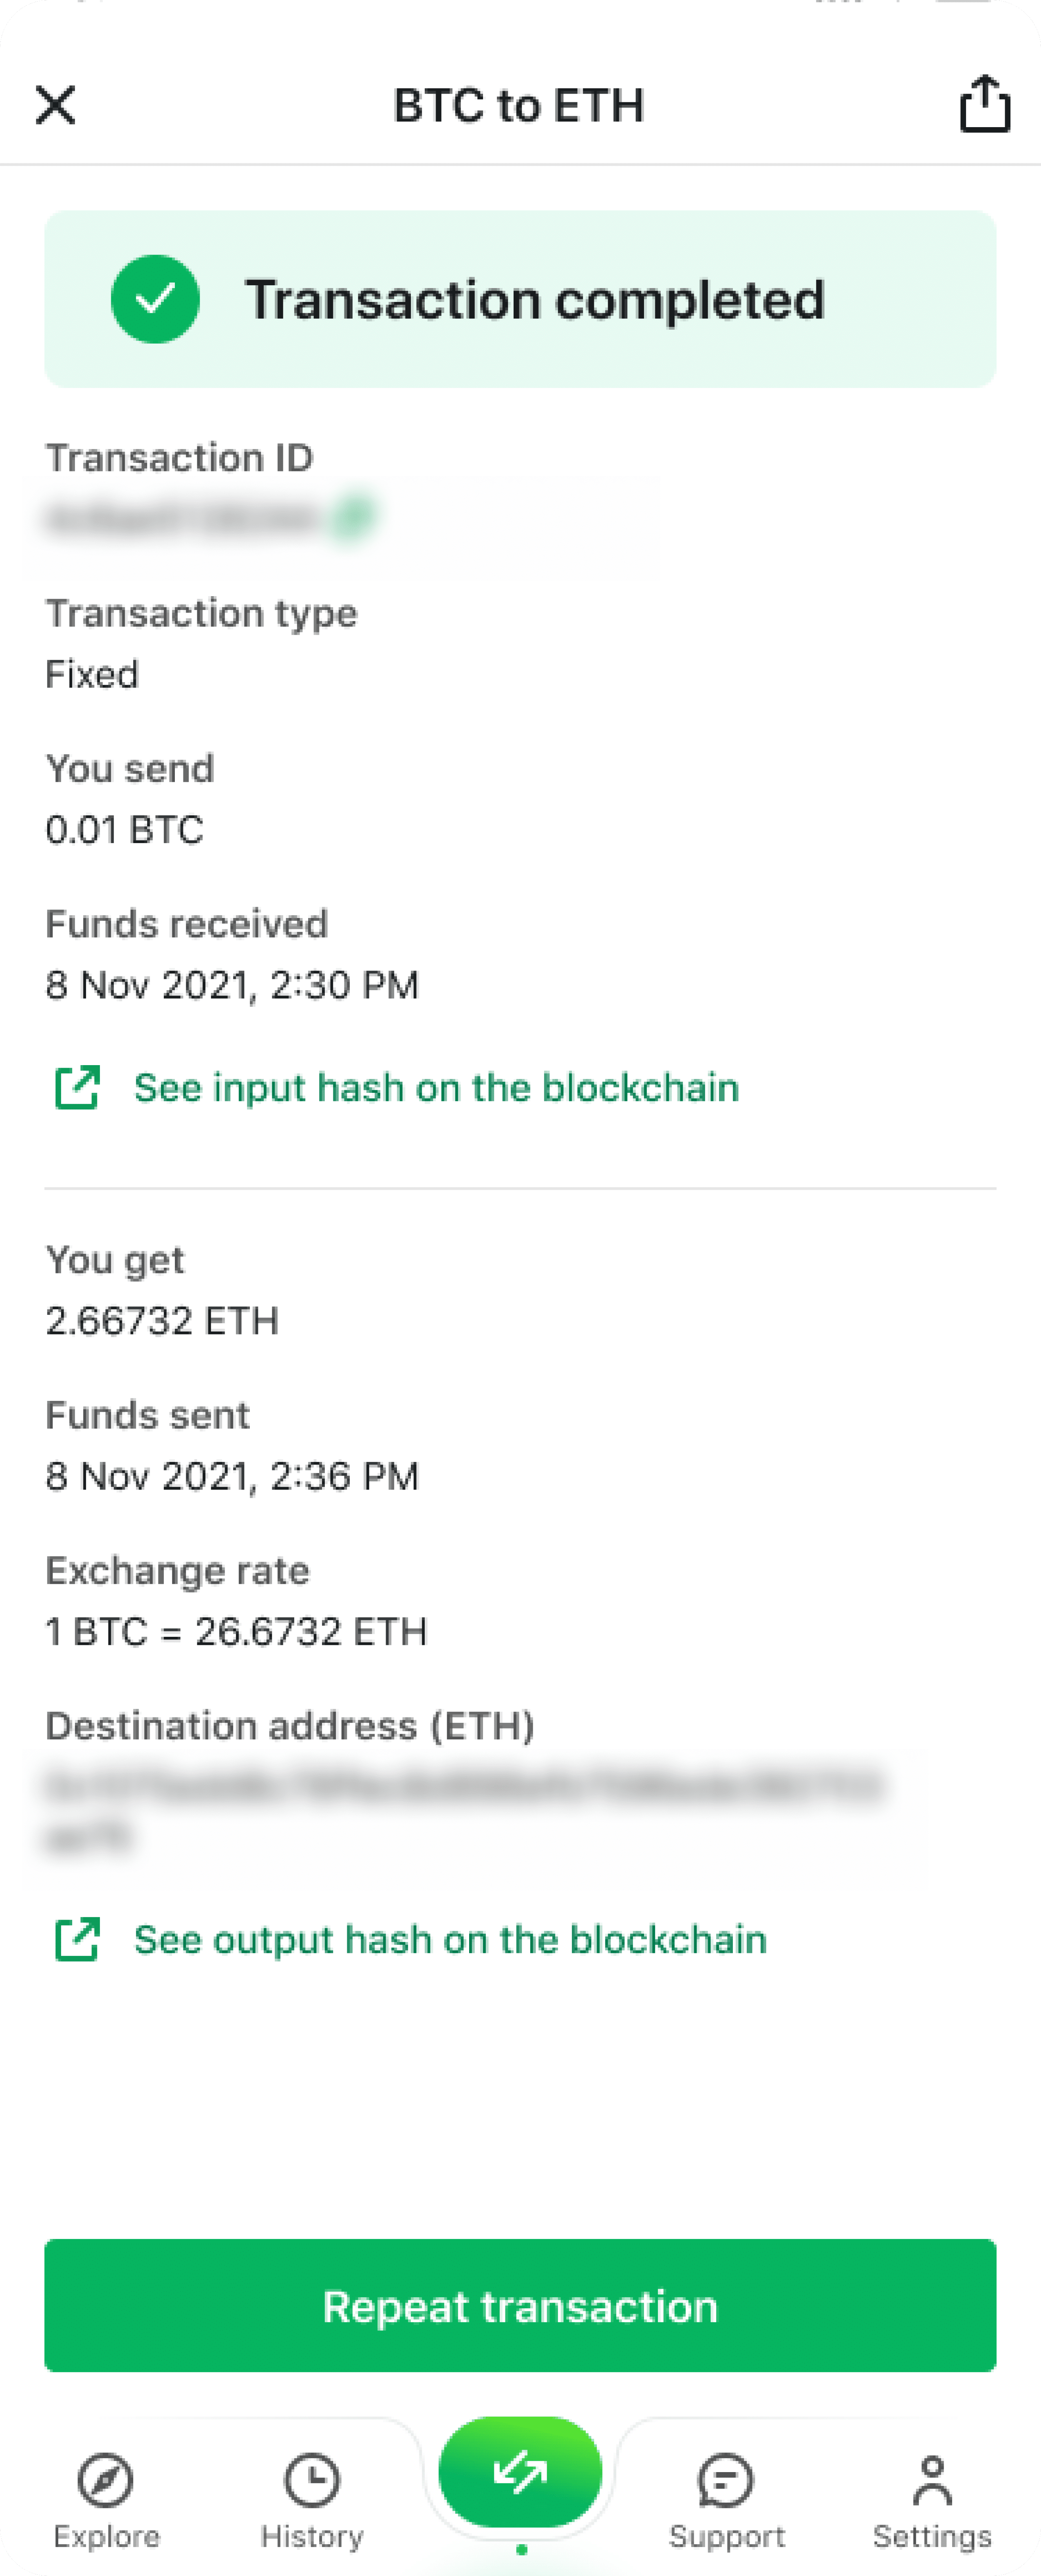
Once that’s done, the transaction is complete — enjoy your new crypto!
How to Buy Crypto in Changelly App on iOS
Step 1. To buy crypto via the Changelly app, go to the Buy tab on the Convert screen.
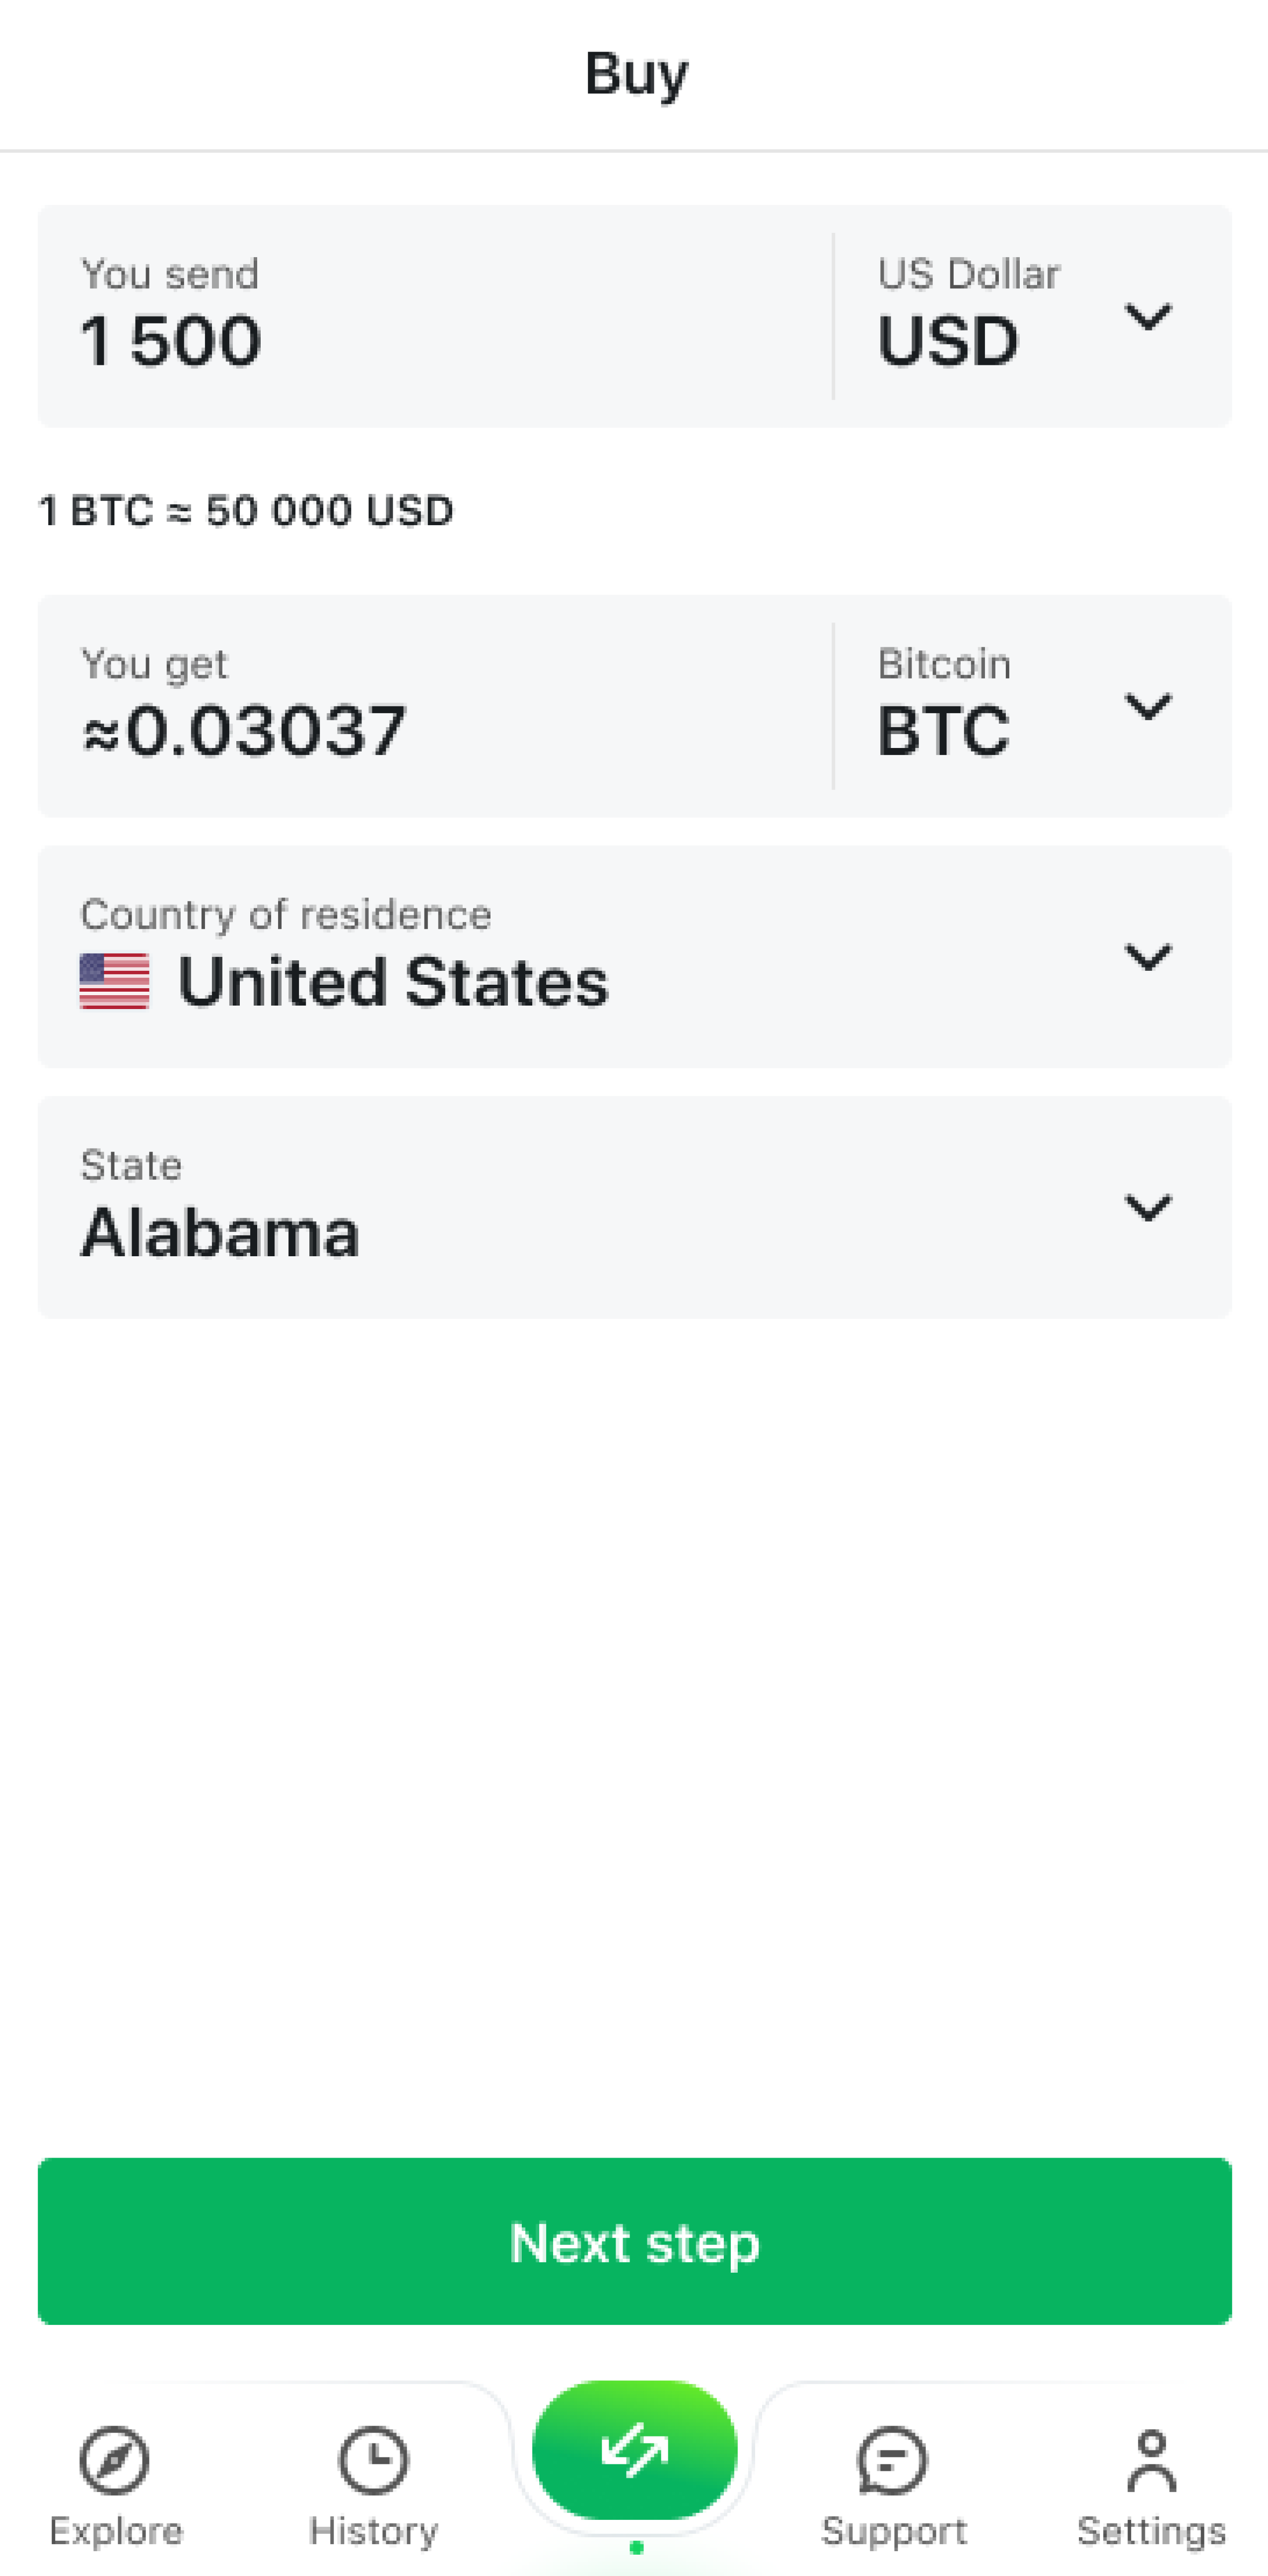
Step 2. Then, select the currencies you wish to spend and buy respectively, enter the amount, and choose your country of residence. Tap the button at the bottom of the screen to see the list of offers available for your transaction.
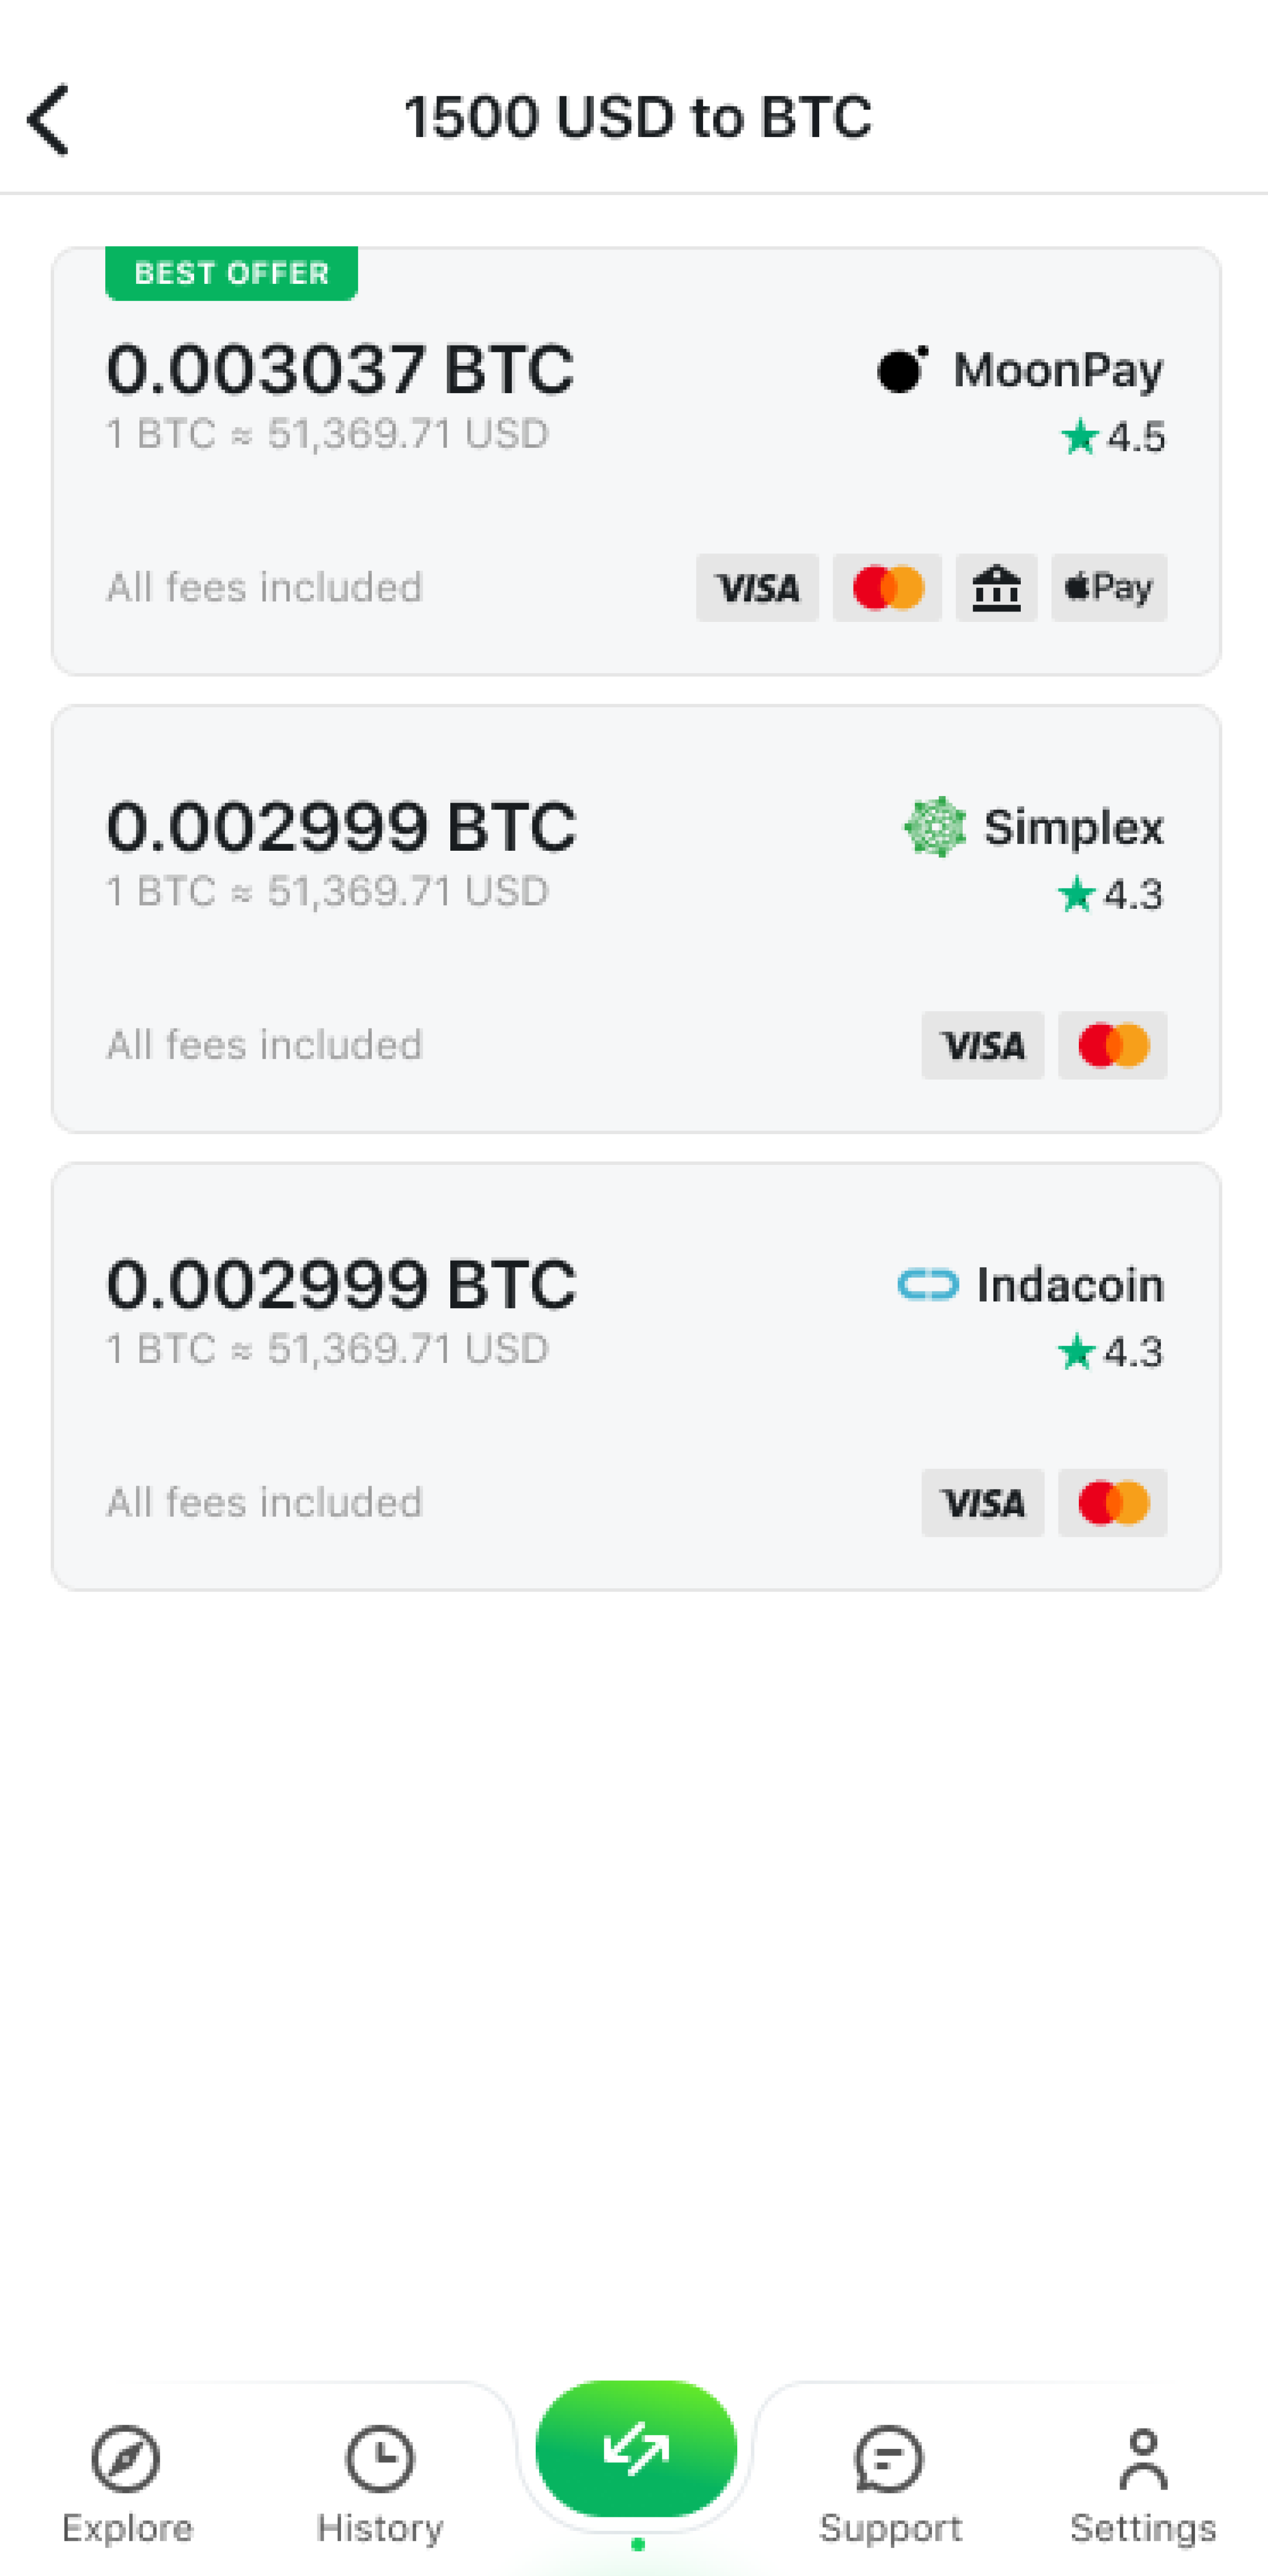
Step 3. Pick the one you like best, enter your destination address, and tap Confirm. You will be redirected to our partner’s website.
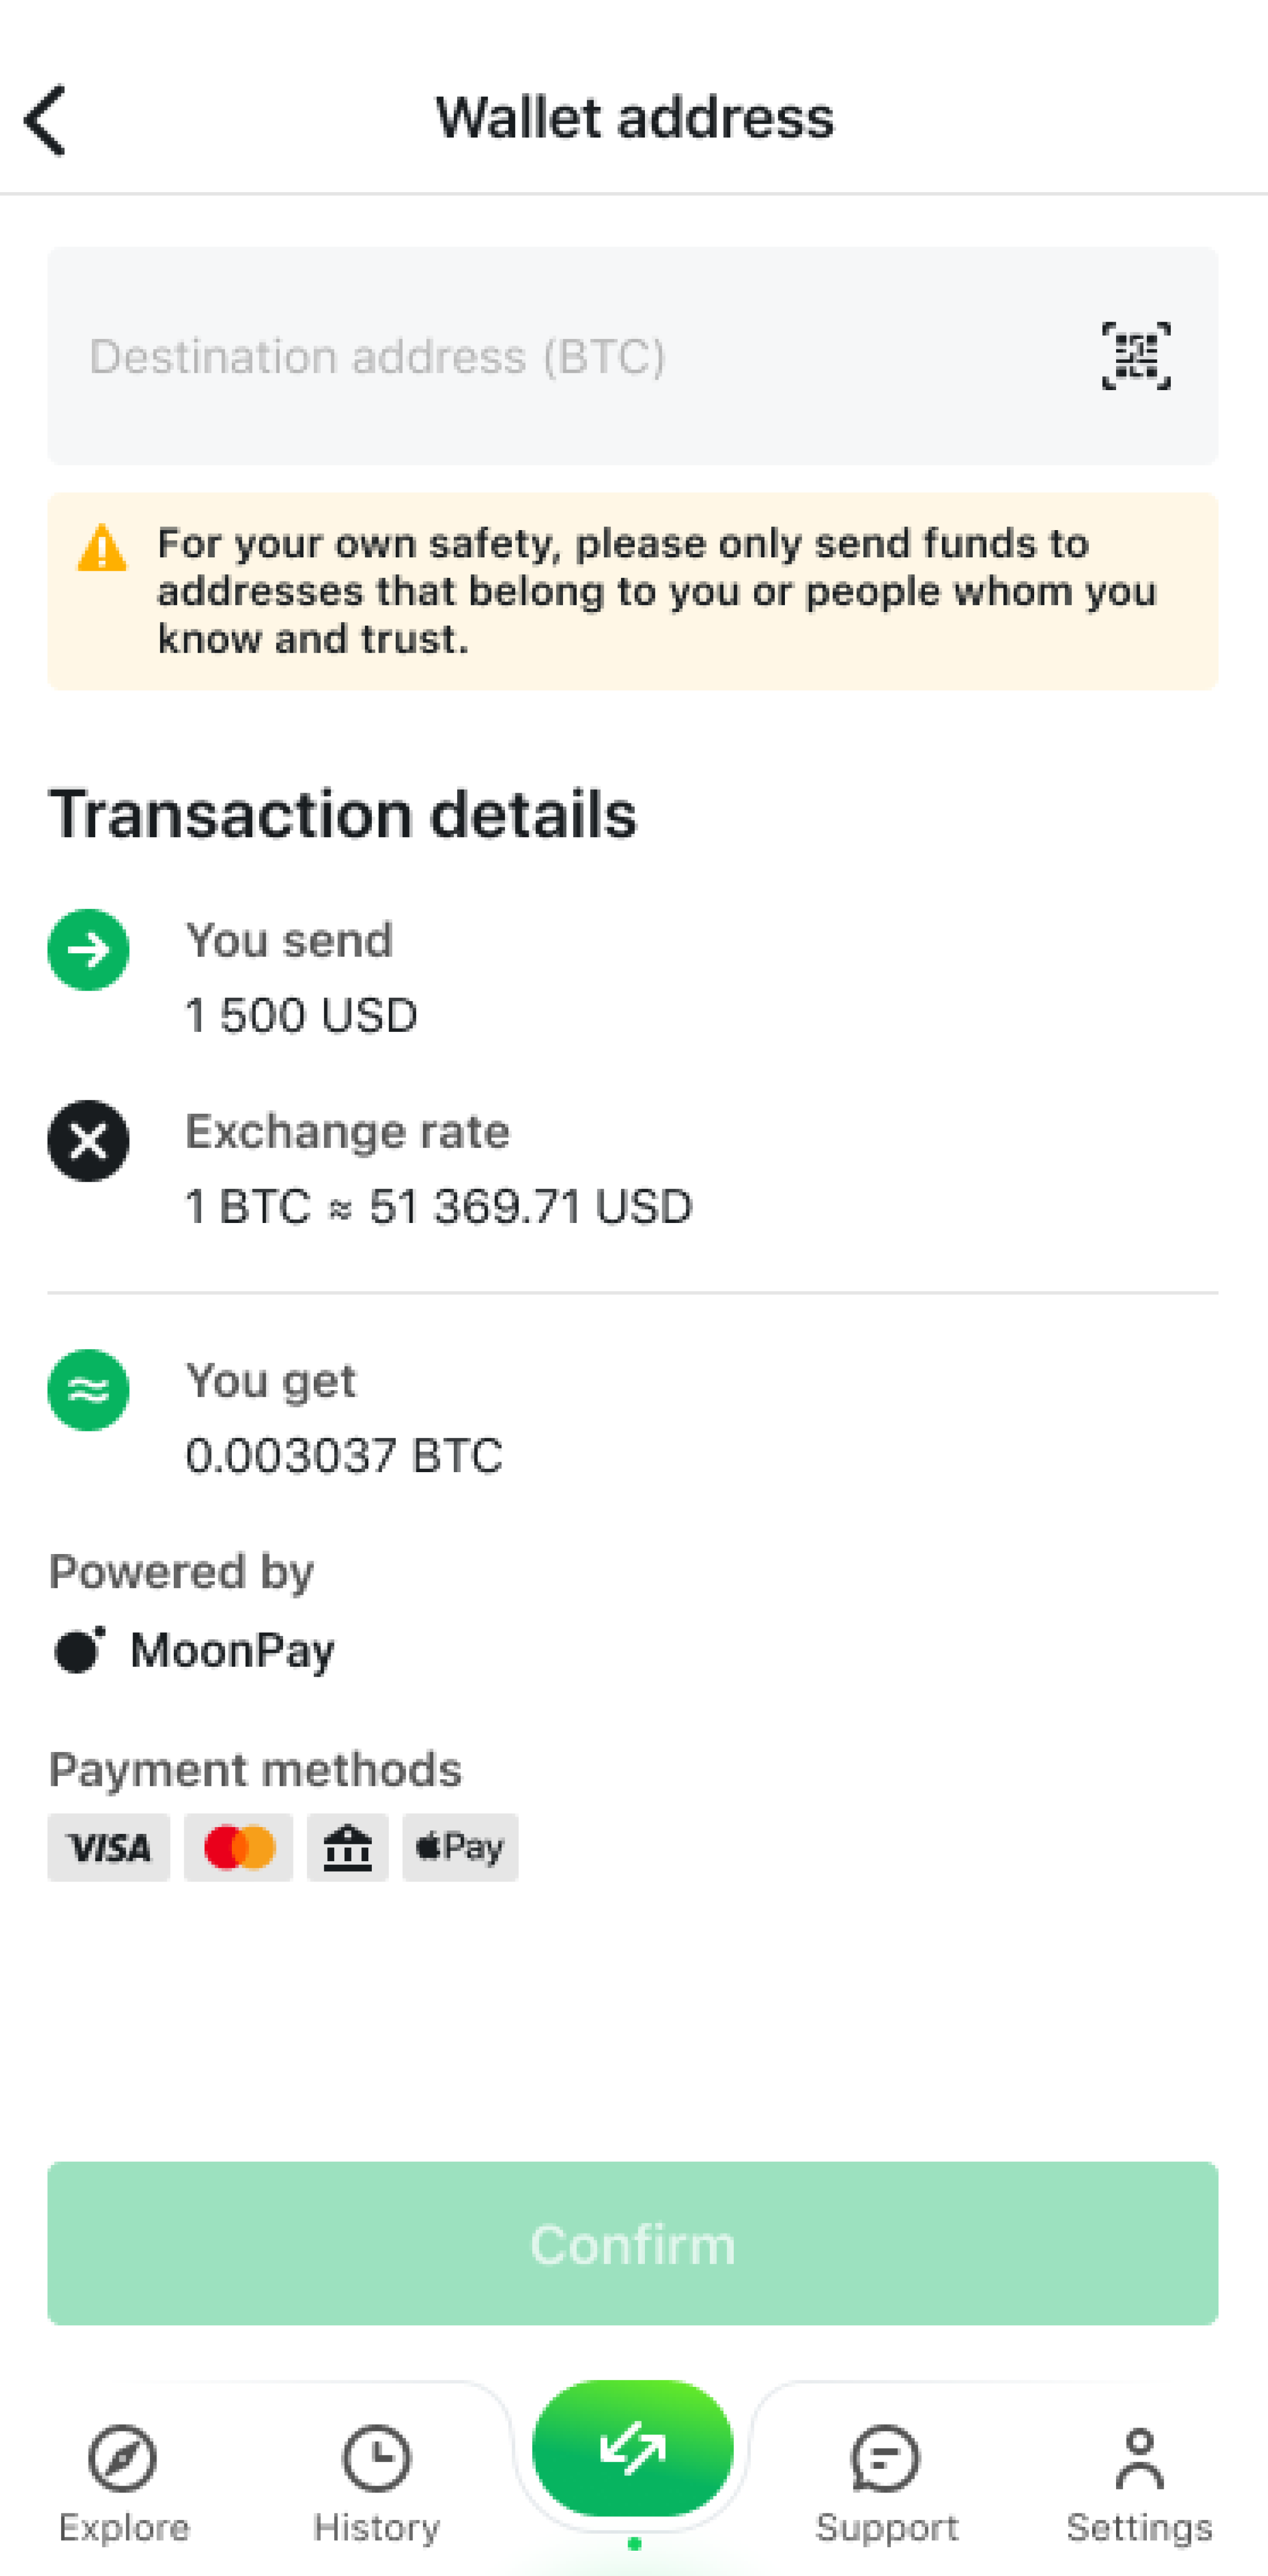
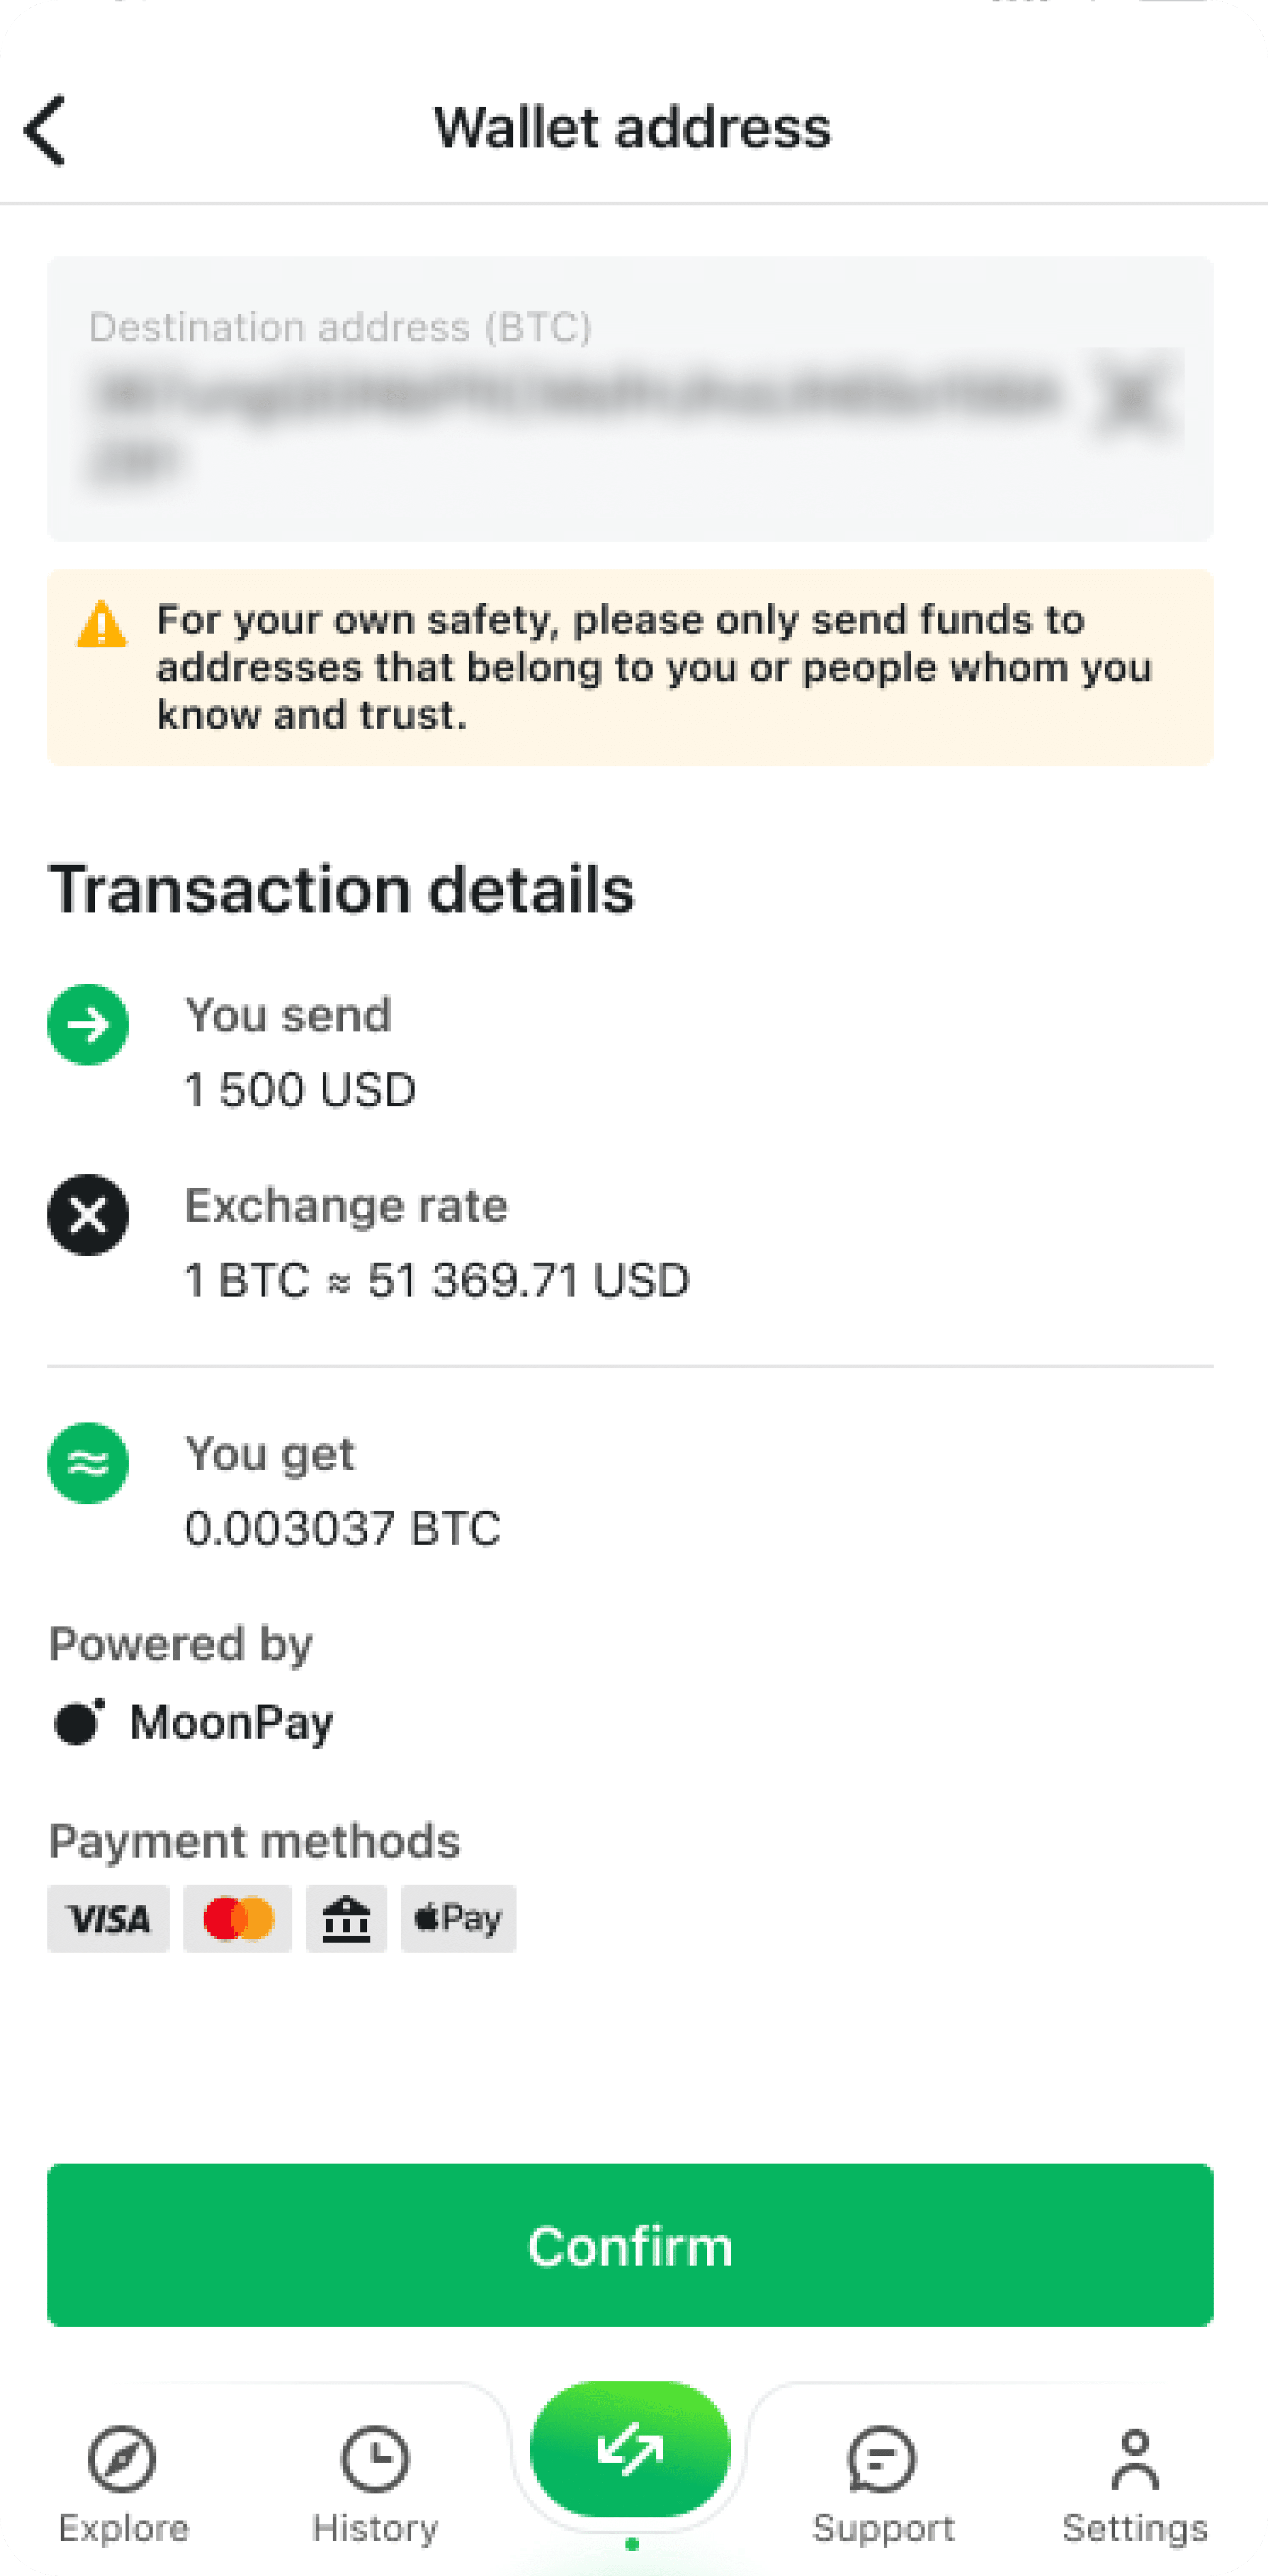
To learn more about making crypto purchases via Changelly, please check out our guides to Banxa and Simplex. Please note that fees may vary depending on the cryptocurrency you’re buying — you will be able to view them on our partner’s website. They are included in the transaction amount.
Something’s Wrong. What Do I Do?
On some super rare occasions, you may encounter one of the following issues.


If your transaction fails, follow the instructions and contact our Support team immediately by tapping the “Contact support” button or via the live chat in the Support tab. Don’t hesitate to contact us at any time — our support agents work 24/7.
If the transaction expires, then you will need to create a new one.

If the transaction is on hold, it means you will need to go through a verification process (KYC). Tap the “Verify identity” button to proceed.
Refunds
Refunds on Changelly are usually issued in two cases:
If there are any issues at our end, we will pay the fee for the refund transaction.If there are any issues with the information you entered or the funds you sent us as payment, we will have to deduct the fee for the refund transaction from the amount we will send back to you.

This is the screen you will see if your transaction gets refunded. Refunds are usually issued after we confirm them with you first, so don’t forget to check your email inbox and spam folder if there are any issues with your transaction. Refunds without confirmation only occur for fixed-rate transactions and in just two specific cases:
If your funds don’t arrive in our wallet within the set time limit;If the amount we receive from you is substantially smaller or bigger than the amount we were supposed to get.
Please note that in most cases, the refunds are processed with a network fee withdrawn from the amount we send back to you. The only exception to this rule are cases where the refund happens due to a technical issue on our side.
You can learn more about our refund policy in this article. If you have any other questions, please don’t hesitate to contact our support team at [email protected].
To minimize the risk of running into any issues, please don’t forget to always double-check all transaction details. Last but not least, make sure to send all your funds in a single transaction and account for the network fee. For the transaction to go through, we must receive the exact amount we requested from you.
What Is Memo.ID?
The term “Memo.ID” is commonly used to describe unique IDs that several cryptocurrencies need you to provide in order to complete transactions. Here is a list of cryptocurrencies that ask you for additional information when you send a transaction.
We kindly remind you to double-check all the details when initiating a transaction.
Disclaimer: Please note that the contents of this article are not financial or investing advice. The information provided in this article is the author’s opinion only and should not be considered as offering trading or investing recommendations. We do not make any warranties about the completeness, reliability and accuracy of this information. The cryptocurrency market suffers from high volatility and occasional arbitrary movements. Any investor, trader, or regular crypto users should research multiple viewpoints and be familiar with all local regulations before committing to an investment.

